Hack: Tongue and groove cladding the easy way

Real wood tongue and groove cladding in our Dining room
This post contains affiliate links, for more information take a look at our disclosure page
When we moved in to our 1930s fixer upper, we knew we wanted to feature tongue and groove panelling in areas around the house. The charm and detail it brings to walls is a look we've long loved. In this post we’re going to show you a couple of different options for achieving a charming tongue and groove panelling look in your room, one which is a bit of a hack that's super affordable!
Having installed tongue and groove wall panelling in three rooms now; our kitchen-diner, bathroom and small WC, we're seasoned in different approaches to installing it - naively thinking it would be straight forward when we first tried it out in our dining area.
Well, as it turns out, tongue and groove can be a little bit of a fusspot when it wants to be, and depending on where you're installing it, there are different fitting options and price points to think about. So if you're considering installing tongue and groove somewhere in your home too, read on to find out our top tips on how to achieve a stunning look that will last.
Option 1: Pre-made and cut EASIPanel tongue and groove panelling

our bathroom with tongue and groove panelling by EASIPanel
Sometimes you find a product that you find yourself recommending to friends and family, and this was one of those. One of our requirements was that we wanted our bathroom to have a tongue and groove panelling and it was important that it would not expand and contract like wood does in a moist environments.
When we first looked into MDF we thought it would be a no-go. Ever seen a piece of MDF get wet? The result is like when a Gremlin gets wet - it will leave you a bit angry and messy.
EASIPanel tongue and groove wall panels are made of moisture-resistant MDF. The dimensions for the boards we used were 152.2 x 51.6 x 0.6 cm, so they are long panels which can be easily cut down to size. If you prefer shorter tongue and groove, EasiPanel supply different sizes. While they arrive pre-cut with self adhesive sticky panels on the back, they are best installed by nailing them onto a thin wooden frame against your wall to provide a sturdy base.

our bathroom with EASIPanel tongue and groove cladding
The magic of EASIPanel is that you get a uniform tongue and groove look and although it doesn’t look completely natural, it gives you a pretty convincing wood-grain look, with no knots or imperfections. It’s also got a nice beading running through it.
It’s not exactly cheap, and per square metre you’re looking at more than twice the cost of the cheapest wood solution, but if you’re looking for a smart consistent look or are trying to install in a wet area this option might be for you. If you choose to install it yourself, you'll save money in labour costs too.
Cons
Not cheap per sq metre
Doesn’t look as ‘authentic’ as real wood
Not as hardy as wood
Pros
Looks uniform and smart
Provides lovely detailing
Moisture resistant
Cheaper labour costs
Very easy to cut
Option 2: Traditional wood tongue and groove cladding panels
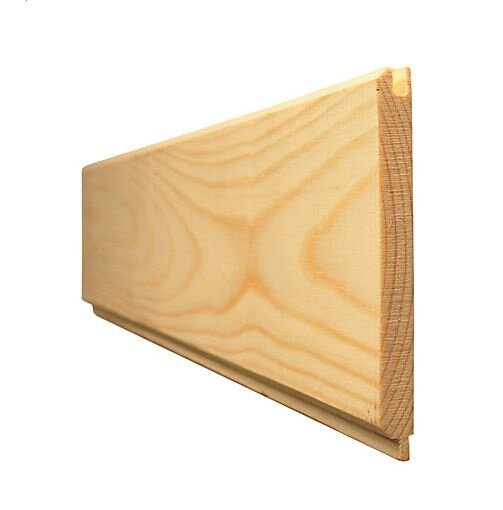
The tongue and groove in our kitchen-diner and our small WC was composed of lots of very thin pieces of softwood timber that were pre-routed at the edges to give the tongue and groove look. We used these tongue and groove cladding panels to achieve the look - fitted by our builder.
Fitting was straightforward but a bit fiddly for a trained builder as there's a lot of measuring, cutting and nailing straight involved - there are easier solutions if you want to DIY (see below). A frame is screwed into the wall/area you want tongue and groove to sit, built with long pieces of timber. The tongue and groove pieces are slotted and nailed into place. It's not a fast job and installation costs could be quite high if you are not doing this yourself, however it is worth noting that the costs of the materials can be quite cheap.
Like most cheaper wood you purchase, the tongue and groove panels can tend to be full of knots - so one thing to bear in mind which we didn't consider until the panelling was all in place, is that you must first use knotting solution before you prime/undercoat/paint the wood.
We also found out that wooden tongue and groove panelling is actually not recommended for areas that are going to get damp/wet, this meant that we actually had to hunt for another solution for our bathroom (see Option 2).
Cons
Not moisture resistant
Can look irregular if not installed correctly
Knotting solution should be applied
Pros
Looks more authentic
Materials can be cheaper
Easy to sand and prepare
Easier to sand and repaint in years to come
Conclusion
Honestly, we love both of these solutions, but for our bathroom EASIPanel tongue and groove panels was the way to go.
If you’re looking for a quick easy way to jazz up your space with minimal carpentry we’d definitely recommend going for it.

Real wood tongue and groove cladding in our small WC
Conversely, if the more rustic real wood look is for you, then we’d recommend ensuring that when you buy your tongue and groove cladding panels, you also get some knotting solution (this handy bottle also contains a little brush) whatever you do, don’t paint it without knotting!
Tell us what areas you're thinking about installing tongue and groove to? Do you think you'll opt for real wood or something like EASIPanel?
Thanks for reading,
Neil (& Fifi)