This £70,000 Single Storey Extension is COMPLETE!
I’m coming clean with you in this new episode exposing this recently completed £70,000 single storey extension. I'm not going to lie, this extension project challenged me and in this video I explain why! I hope you like the result 🙏🏼🤞🏻
If you have some extra time and you’re keen to know the single storey extension costs broken down, plus all the suppliers used in the makeover, keep reading!
The homeowners Jen & Stu kindly allowed me to interview them to give you the scoop on the design decisions they went with, how long the extension took to complete & more.
So grab your finest beverage ☕️ and let’s get you prepared for your single storey extension, presuming you’re planning one?? 😅

First, meet Jen & Stu – and their stunning new single storey extension
Hi 👋🏻 we’re long-term partners Jen & Stu, and we live with our daughter and cat in Hove, Sussex. Stu works for a sustainable transport charity and Jen works in the museum sector as a Commercial Manager.
Tell us why you chose to do a single storey kitchen diner extension
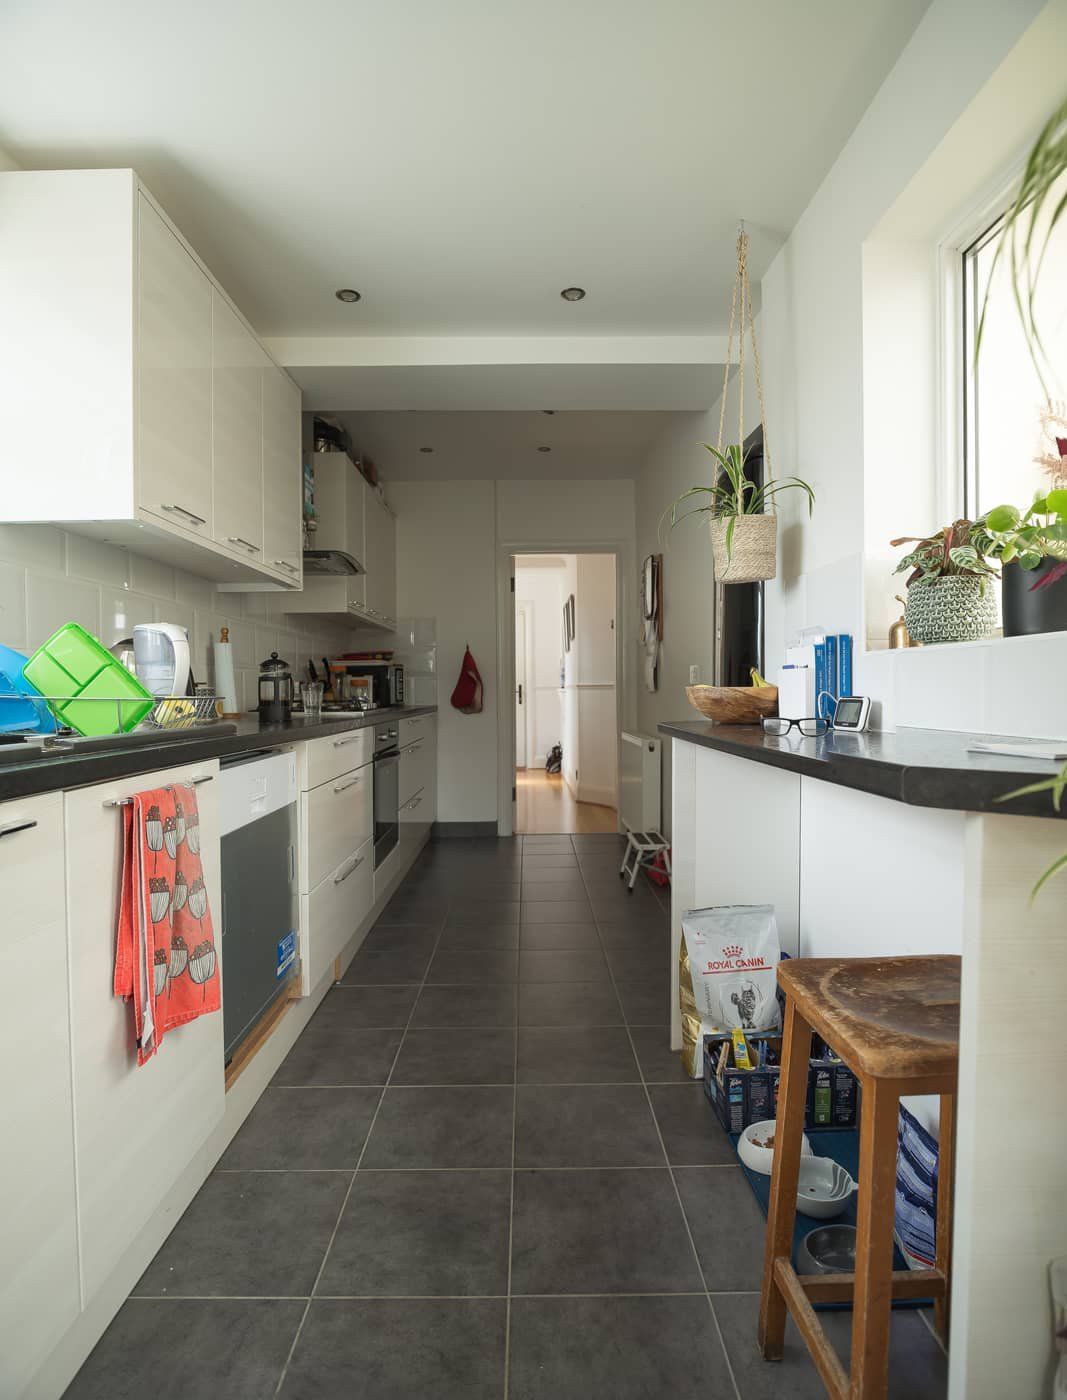
When we moved in, the house had a galley kitchen which was just about big enough, but was cut off from the dining room which is really typical in 1930s homes. It wasn’t a space to be social in and we had always wanted a kitchen that was.


The previous owner added a conservatory onto the side of the kitchen which was unheated so we could only use it to eat in for 5-6 months of the year when it was warm, and during the day. When we bought the house, we always knew that we wanted to knock it down and do a proper open plan single storey rear extension as it didn’t work for our family socially.
How long did the extension take from start to completion?
We started on 15th Feb 2023 and finished at the end of June 2023, so 4 and a half months. The building work took 2 months and the rest was the kitchen & flooring installation and decorating.

What were your single storey extension costs?
If we include absolutely everything on top of structural, flooring and kitchen too (eg. tiling, island pendants, painting and decorating, dining table and chairs and bar stools) then the grand total was £69,675.
Breakdown of costs:
Structural (includes 3 x velux, 2 windows, plumbing, electrical, outside render and first coat of paint = £46,800
Sliding Doors = £2000
Flooring and installation = £3,500
Kitchen supply and installation = £15,000

Has adding this single storey extension increased the value of your property?
We haven’t had it officially valued. The house down the road is the same as ours but with an office pod in the garden. It was on the market for £750,000 and sold very quickly. Taking into account what we bought the house for and what we have spent on it, we are fairly sure we have increased its value by about £75,000 more than we have spent on it.
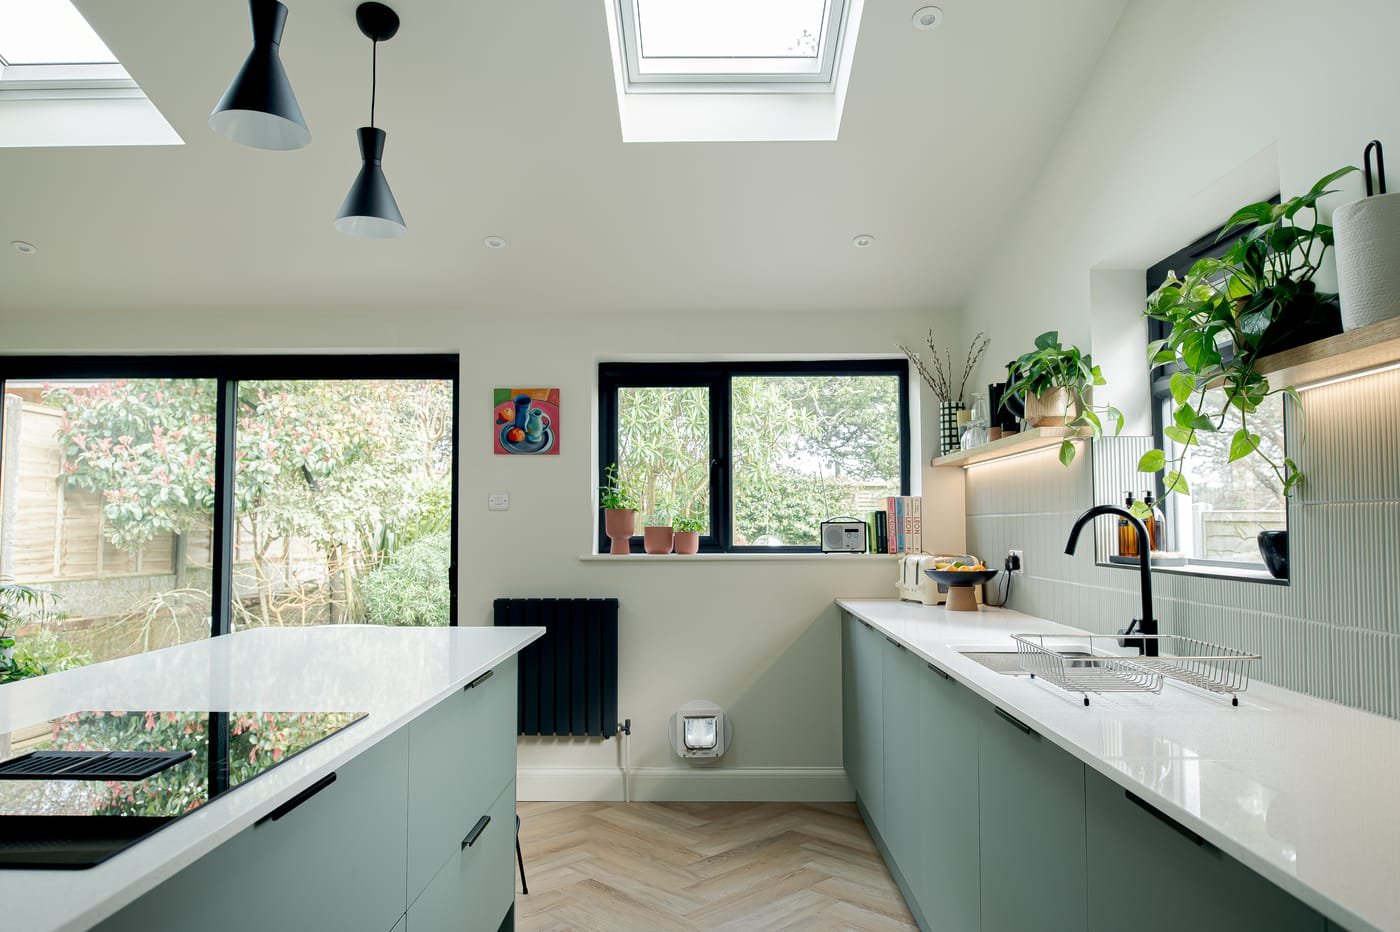

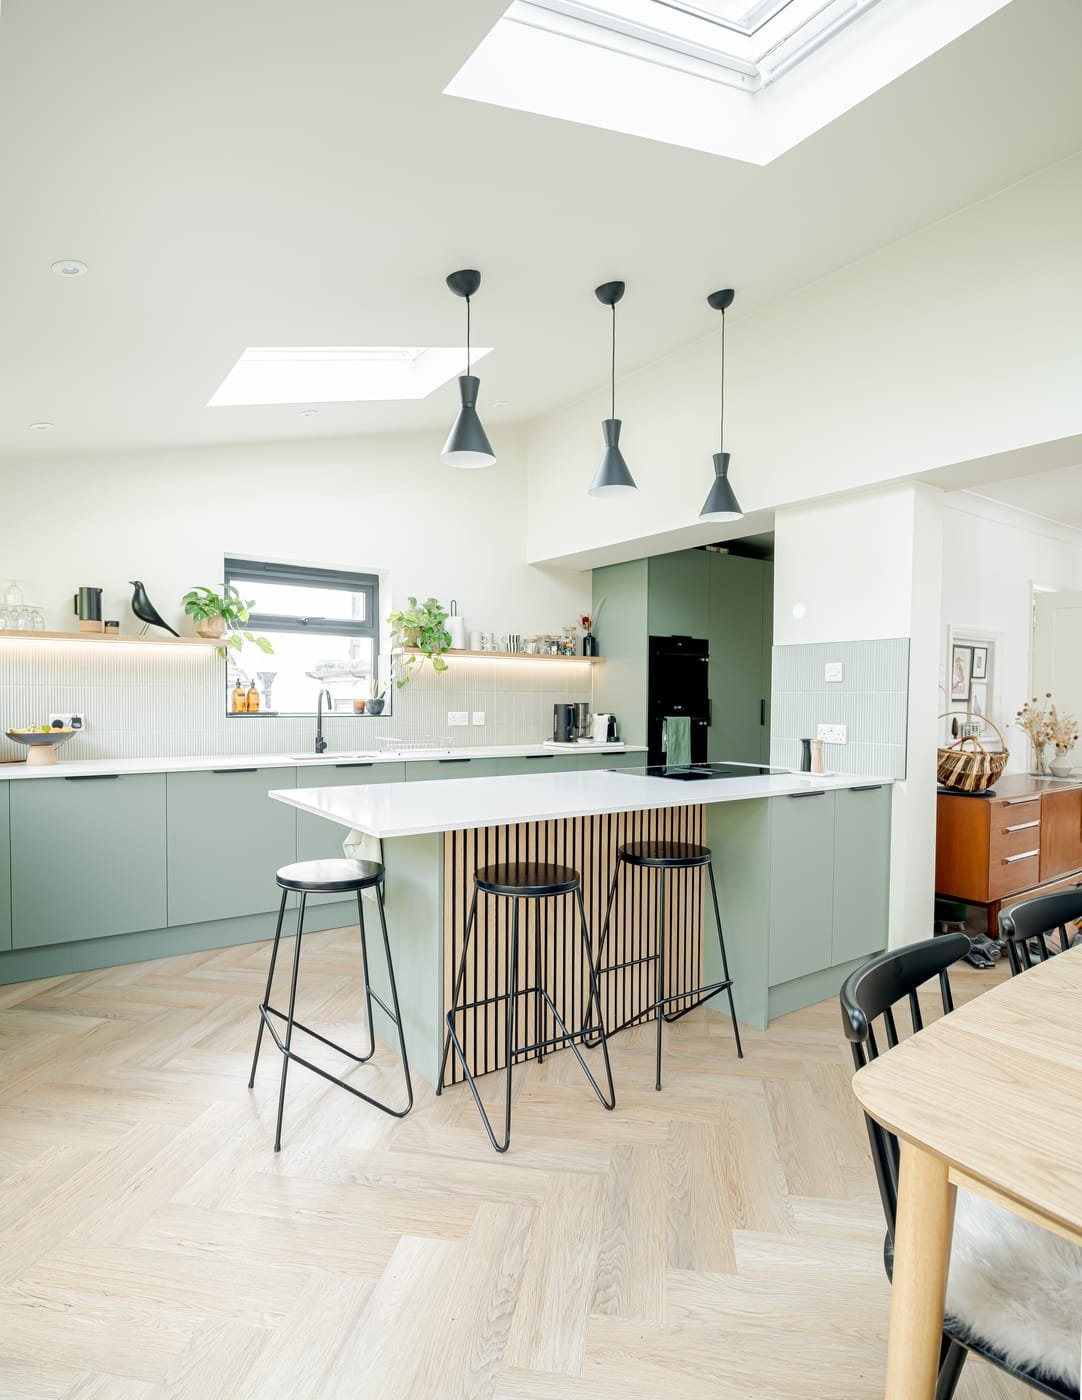
We worked together on your kitchen layout, colours & design but I’d love you to tell readers in your own words about the specific layout & design choices you decided to do. The finish is stunning!
Thank you! We thought long and hard about the design of the kitchen. We had lived in our old kitchen long enough to know what we DIDN’T want, which is always a good starting place we think!
Open plan layout
We had never lived anywhere as a family where we had a kitchen combined with a dining area so we knew we wanted a space where we could be sociable. Part of the design was led by what we could afford and what we could do structurally e.g. we had to have a support where the extension meets an existing internal wall (this is where we decided the island should be placed).
Sociable cooking setup
It was important for us to open it up and so we could have seating around the island and a bigger family dining table. We put the island on the hob as the only other place it could have gone would have left us facing a wall with our back to the rest of the room and away from views to the garden.

Optimising the views
One thing we always wanted the focus of the room to be on was the garden. This is why we chose sliding doors instead of bi-folds. Bi-folds would have increased the amount of vertical framing and interrupted the view to the garden a little more than the sliding doors. Plus the doors when slid back would have jutted right out onto our patio. We just love looking out at all the colours and textures of the garden.
Light & airy styling
The reason we chose open shelving was to keep it feeling big and airy, plus we really liked the idea of having a few nice pieces out on show. A whole row of cupboards would have made the room feel smaller and got it in the way of views to the garden.
The slatted panel under the island was a little feature to bring out the oak shelving and again link back to the garden.
The choice of a green kitchen was also inspired by the garden.

Which kitchen supplier did you use? Did you gather quotes from different kitchen suppliers? How did they compare?
We used a small local kitchen company called Kitchens of Sussex (based in Rottingdean). We got quotes from Wren, Wickes, Magnet and Howdens, we really shopped around!
We had a really strict budget as the building costs had escalated so much since the original quote due to the pandemic and brexit, and we had already put a deposit down with Wren when our builder suggested Kitchens of Sussex as he had used them before and recommended them highly.
We assumed a small local company wouldn’t be able to price match the big names but we were wrong. The fact they had worked with our builder before was a huge bonus and because they already had a great relationship plus as it was a small firm we had a really personal service.
We can’t recommend them highly enough!
Did you use an architect for your kitchen extension drawings? What type of roof did you opt for?
Our builder had an architect that he worked with who had just retired but was still happy to do small jobs, but just the basics.
Although we loved the idea of a fancy architect giving us some amazing ideas and doing something clever (I had longed for a window seat), we had a tight budget having recently done the 1930s loft conversion and this architect knew the ins and out of what we needed to do. He did the structural drawings and calculations for us too, for a very good price.
All the builders we spoke to when we were getting quotes had thought we could do it without planning permission as we weren’t going out any further than the old conservatory but our architect pointed out that actually the new roof was higher than the original and therefore we did need it so he got that sorted for us too.
We decided on a pitched roof for longevity and internal ceiling height. It was only a little more expensive than a flat roof with a lantern, but has made the aspect much more dramatic.

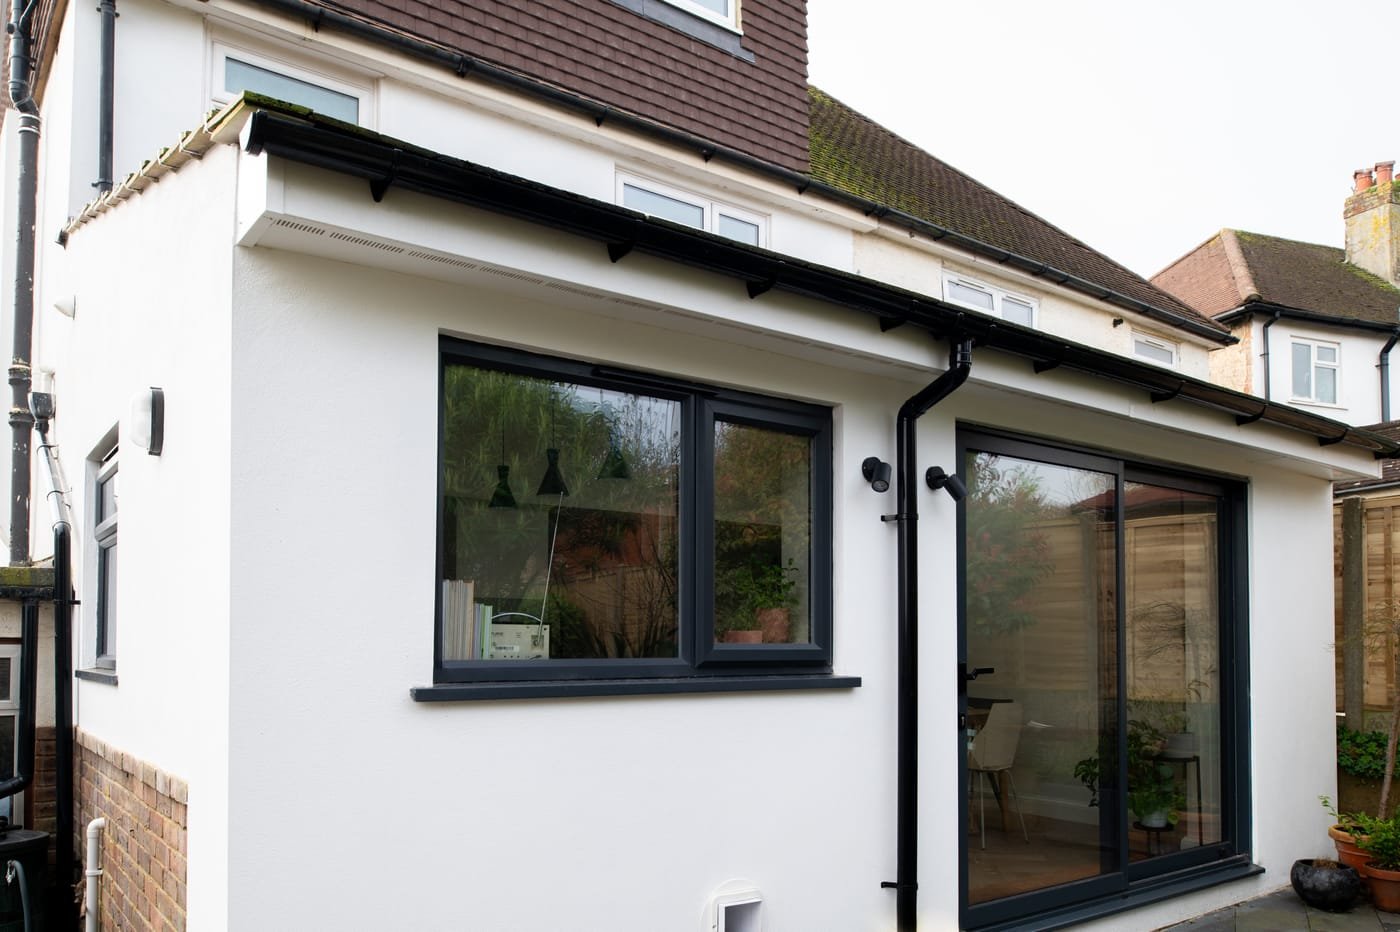
How did you decide on the design for the exterior of your single storey extension?
Led by the builder, we agreed a continuation of the render from the side of the house would be the best option. They had rendered the side when doing the roof and it made the two parts of the whole job become one.
How did you (and your lovely cat) cope while the single storey extension was being built?
Our builder put up an internal stud wall across the back of the house to minimise the dust and try and keep the elements out when they removed the old conservatory and started taking down walls.
We were lucky enough that our cooker, fridge freezer and some cupboards were on the internal side of the stud wall and the builder made us a door out to the rest of the old kitchen where the sink, dishwasher and washing machine was. It was really weird going out in the evening to load the dishwasher or use the sink in the evenings! It was so exposed, it felt a bit like doing the washing up when we go camping!
We’re really pleased we had done the upstairs and loft first as it was ours (and our cat's) sanctuary while it was all going on. The extra floor space up in the loft enabled us to store some things upstairs while the work was going on.


Finally, we’d love to share with readers the superbly curated design suppliers used throughout the project
We did loads of research and really shopped around. We probably could have tiled the whole kitchen with the amount of samples we got. Same with the flooring! We also got lots of inspiration from Pinterest, interiors magazines and the wonderful Fifi McGee!
Tiles: Topps Tiles - Flute Sage Decor
Kitchen cabinets: Kitchens of Sussex
Kitchen handles: Kitchen of Sussex
Worktops: Quartz from Magrasil
Bar stools: B&Q
Island cladding: Wood Veneer Hub
Under shelf lighting: LED strip lighting fitted by our kitchen supplier
Island lights: Lights.co.uk -Lindby Savrini Pendants
Flooring: Tapi carpets - LVT Herringbone Beauvais
Dining table & chairs: Table from Cult furniture, Chairs from John Lewis
Plan Your Dream Home Extension (without the mistakes!)
If you’re in need of support with avoiding costs spiralling during your extension project, then also look at my free 3-day renovation series. Give me 15 minutes of your time every day and it will set you up for success with your project – that, I can promise!
Thank you so much for reading and a huge thank you to Jen & Stu for sharing so much about their project – and for being a DREAM to work with.
Hope to see you again soon,
Fi xoxo