Our Living Room Design Revealed: What we WISH we knew & How to renovate yours
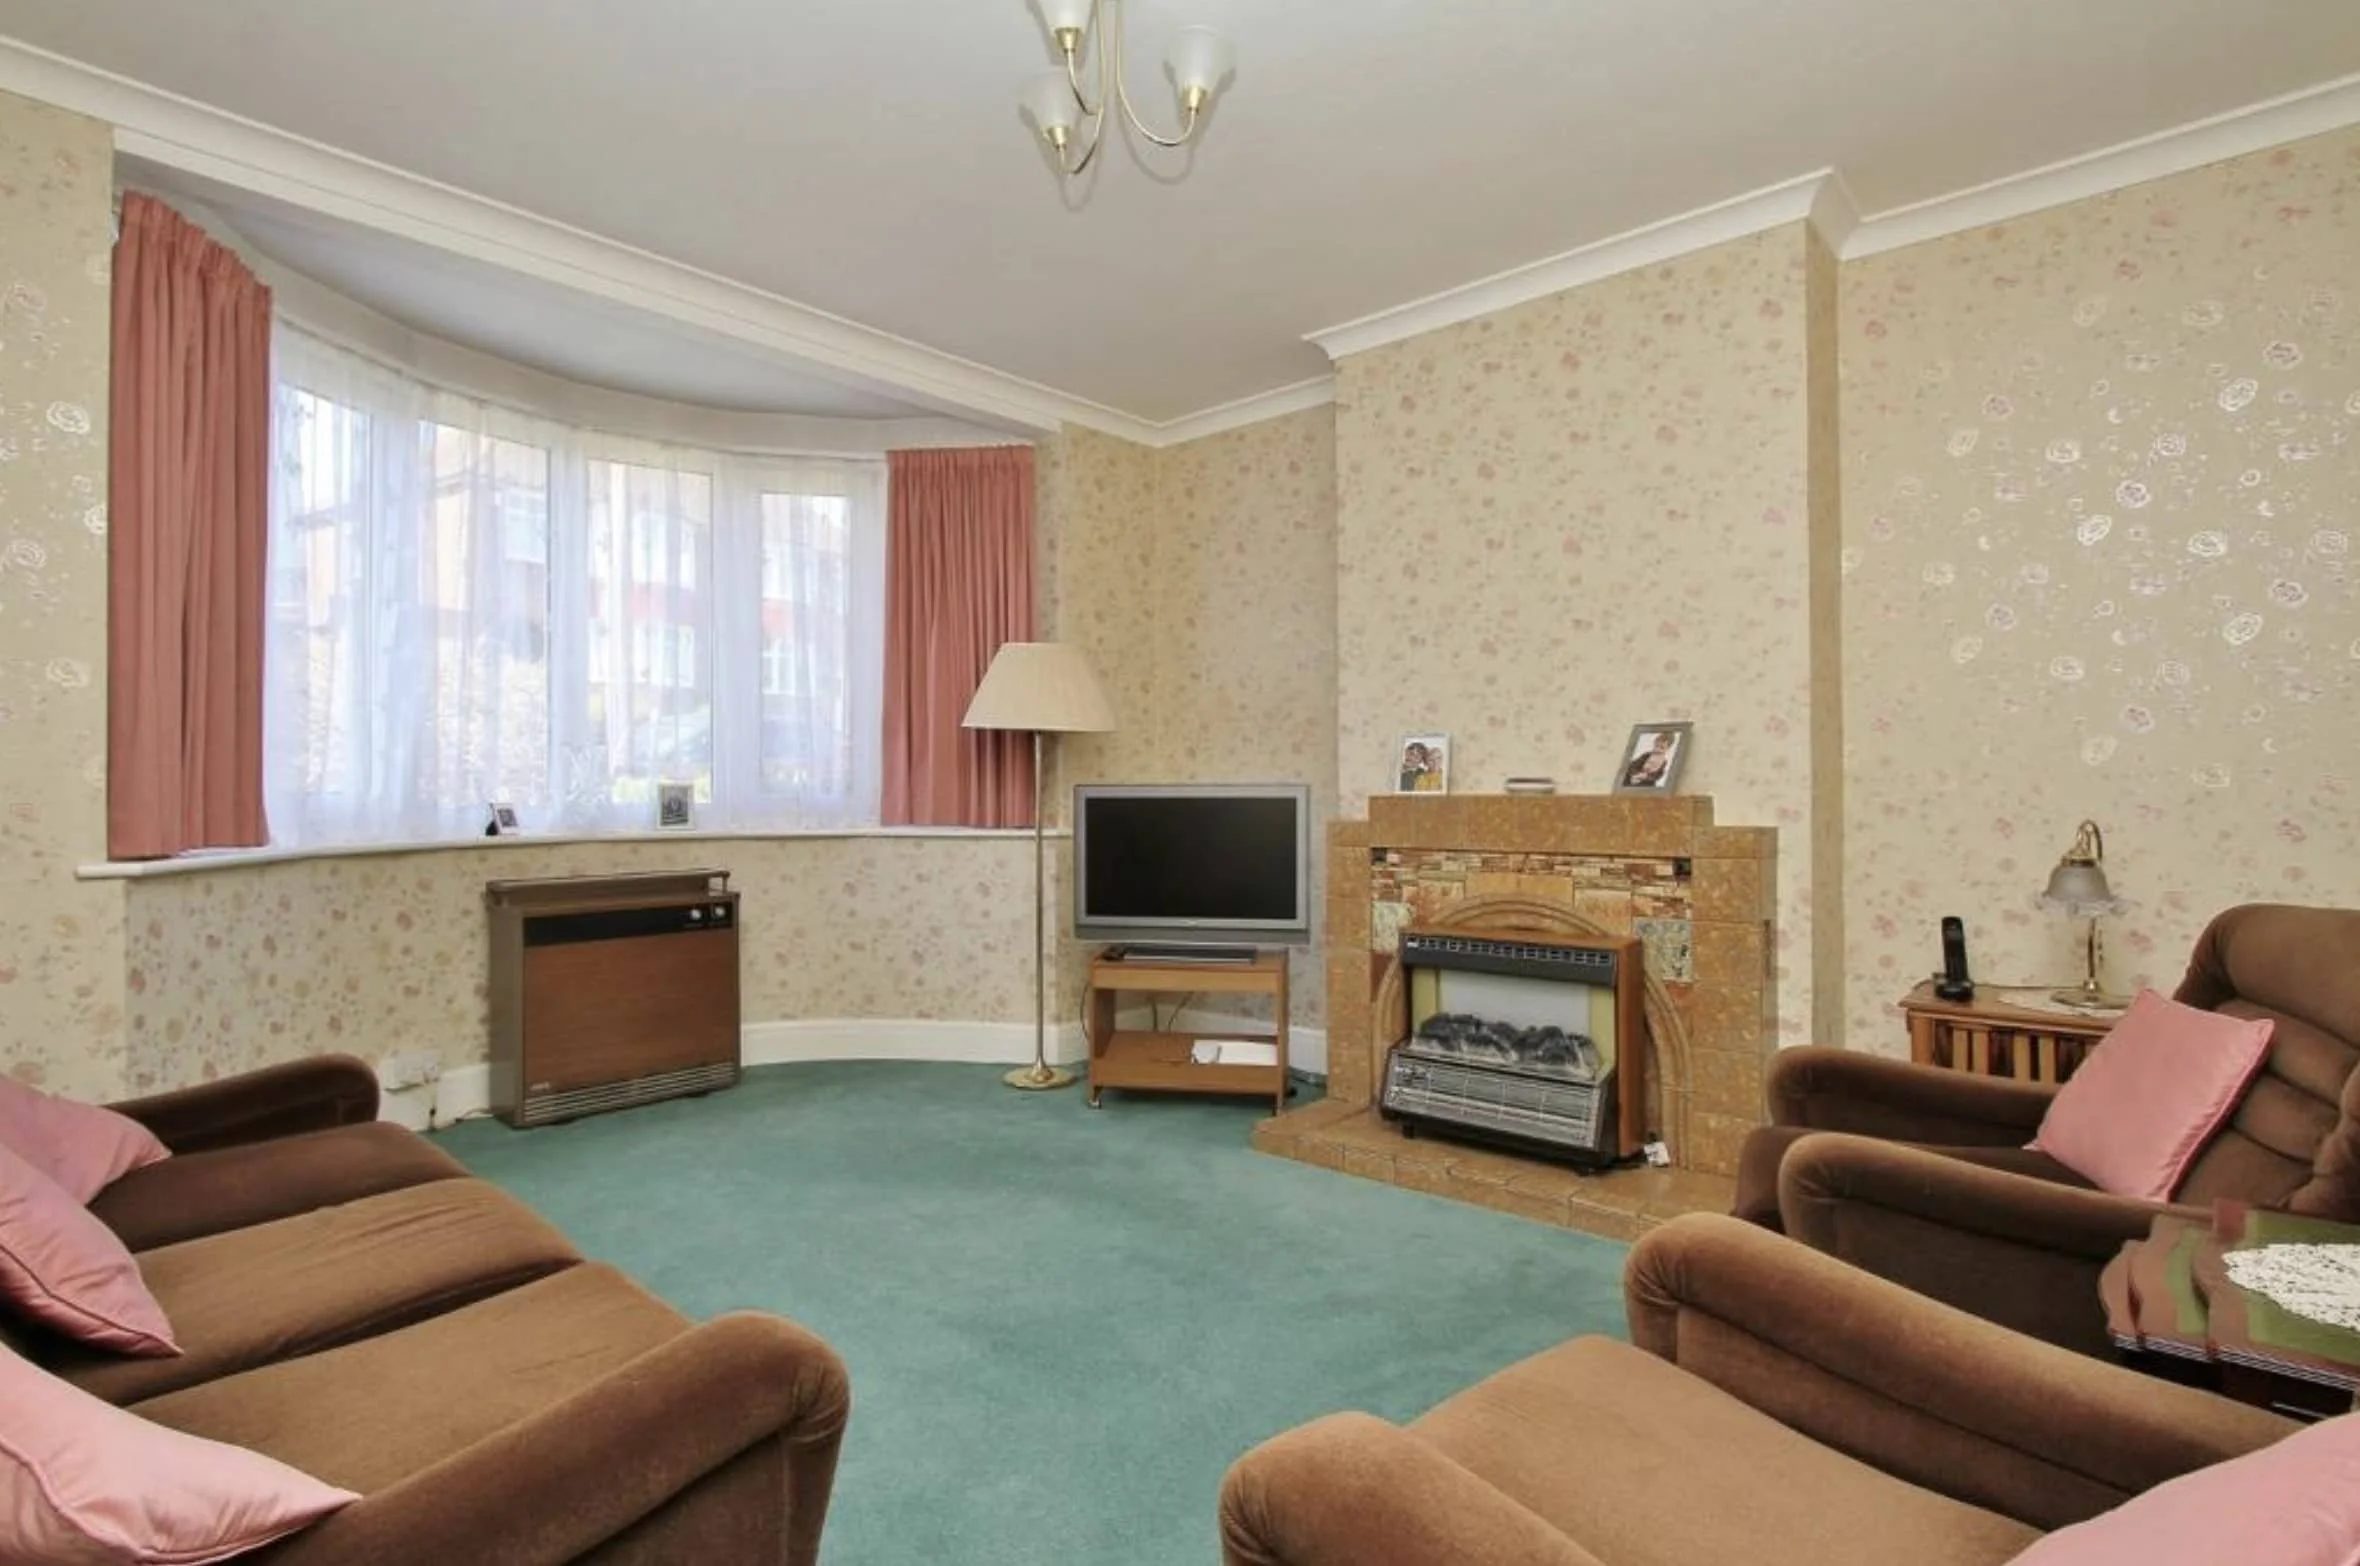
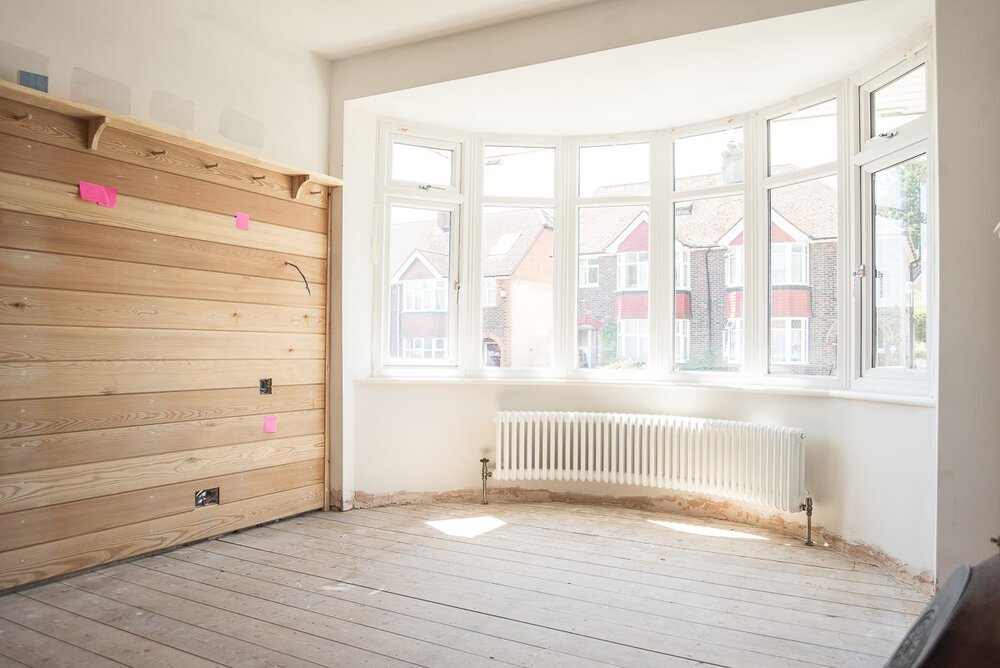
BEFORE – our 1930s living room renovation needed everything replaced!
I can’t believe it’s been 7 years since Neil and I moved into our 1930s semi detached house that needed everything ripped out 😱
We got the keys in 2016 but it only feels like yesterday we were toasting to our new home, trying to ignore the mountain of boxes surrounding us and trying not to think about the filthy shag pile carpet under our feet 😂
If you haven’t watched our living room renovation video, watch it below first, so you can see the various ‘faces’ the room has had over the years as we phased the work!
I also shared some of the huge mistakes we made in this room in the past👇🏻

Now…. are you ready for the nitty gritty details? 😄
In this post, I’m going into more detail on the technical aspects of the living room renovation for those of you who need help to ease the decision fatigue. With the experience I have as an interior designer now, there’s some advice I have for you if you’re planning a living room renovation soon – including things I would do differently if we were starting over, and what I propose on client projects like our Surrey renovation.
What we’ll cover together in this post:
Colours – Advice to speed up your colour decisions & the colour scheme we chose
Heating – How we heated the space & recommendations for your project
Flooring – What we’d do differently next time
TV, Speakers & Electrics positioning – how to keep your setup simple with killer results
Lighting – How we light this space & a simple method for your living room plans
Storage – The alcove design & joinery costs if you’re considering a similar thing
Sound insulation & why we DIDN’T go with it
Cohesion – How we integrated the room with the rest of the house
Plus there are loads of suppliers and products mentioned in this post that we recommend you consider (we’re not affiliated with them but I do get trade discount with most).


Caveats before we get stuck in!! 😅
Something to remember while reading this post is that our situation 7 years ago when we first moved into this property was very different to our situation now.
I’m an interior designer now. I have a lot more design & renovation experience than when we first started out. I pack our online courses with my growing knowledge & training that I acquire in every project – to teach homeowners.
Secondly, we had a very tight budget to complete the house when we first moved in.
Lastly, there was very minimal support for renovators back then too. In fact, that’s why Neil and I set up this company. We experienced first hand how tough it was to renovate with such little help out there (unless you spent thousands on professional fees who generally didn’t provide much guidance!)… so we got to work and built our renovation online course to help renovators gain the confidence & community they need to create their dream spaces.
Now enough rambling from me! Let’s get into the nitty gritty details!
Our living room renovation – the juicy details
The colour scheme we chose & advice to speed up your colour decisions
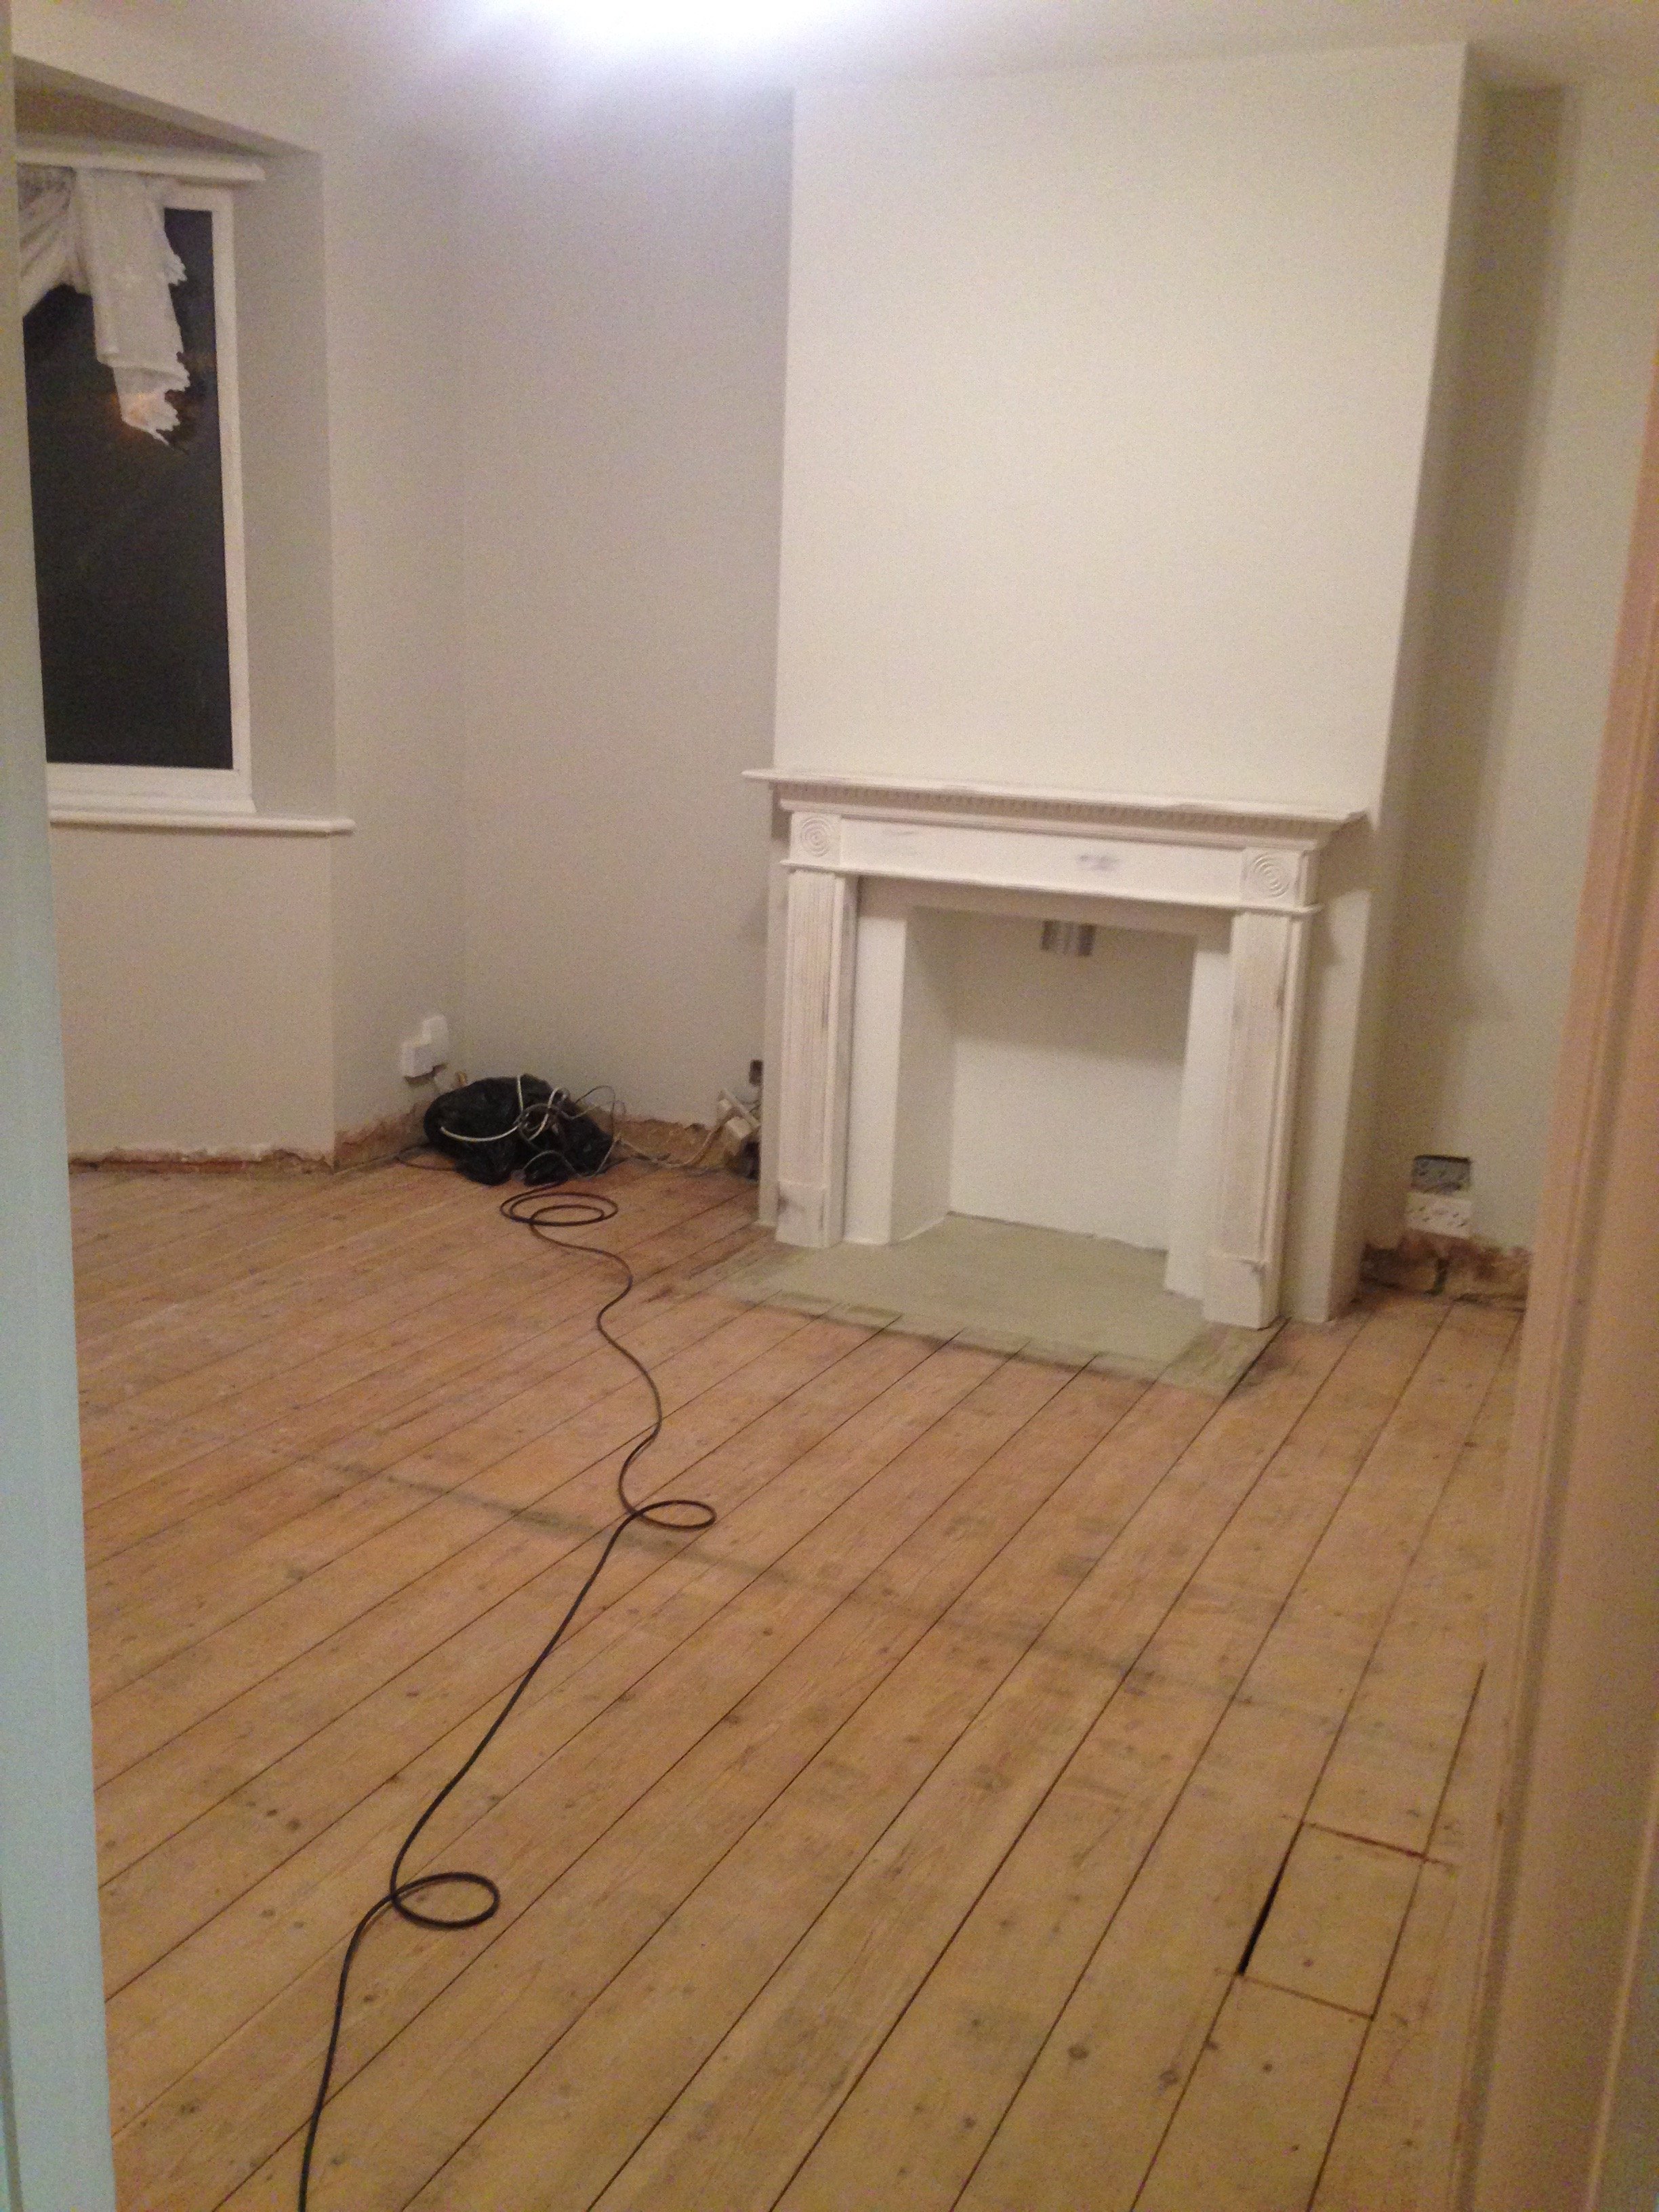
This living room has been decorated and redecorated 3 times over the last 7 years.
Twice with Skimming Stone on the walls and Wimborne White on the woodwork (Farrow & Ball) which I loved. It was such a restful palette to live with and it’s ideal if you’re creating a calm living space that feels fresh in summer but cosy in the winter.

OUR FIRST COLOUR SCHEME: SKIMMING STONE ON THE WALLS, WIMBORNE WHITE ON THE WOODWORK

getting stuck in!
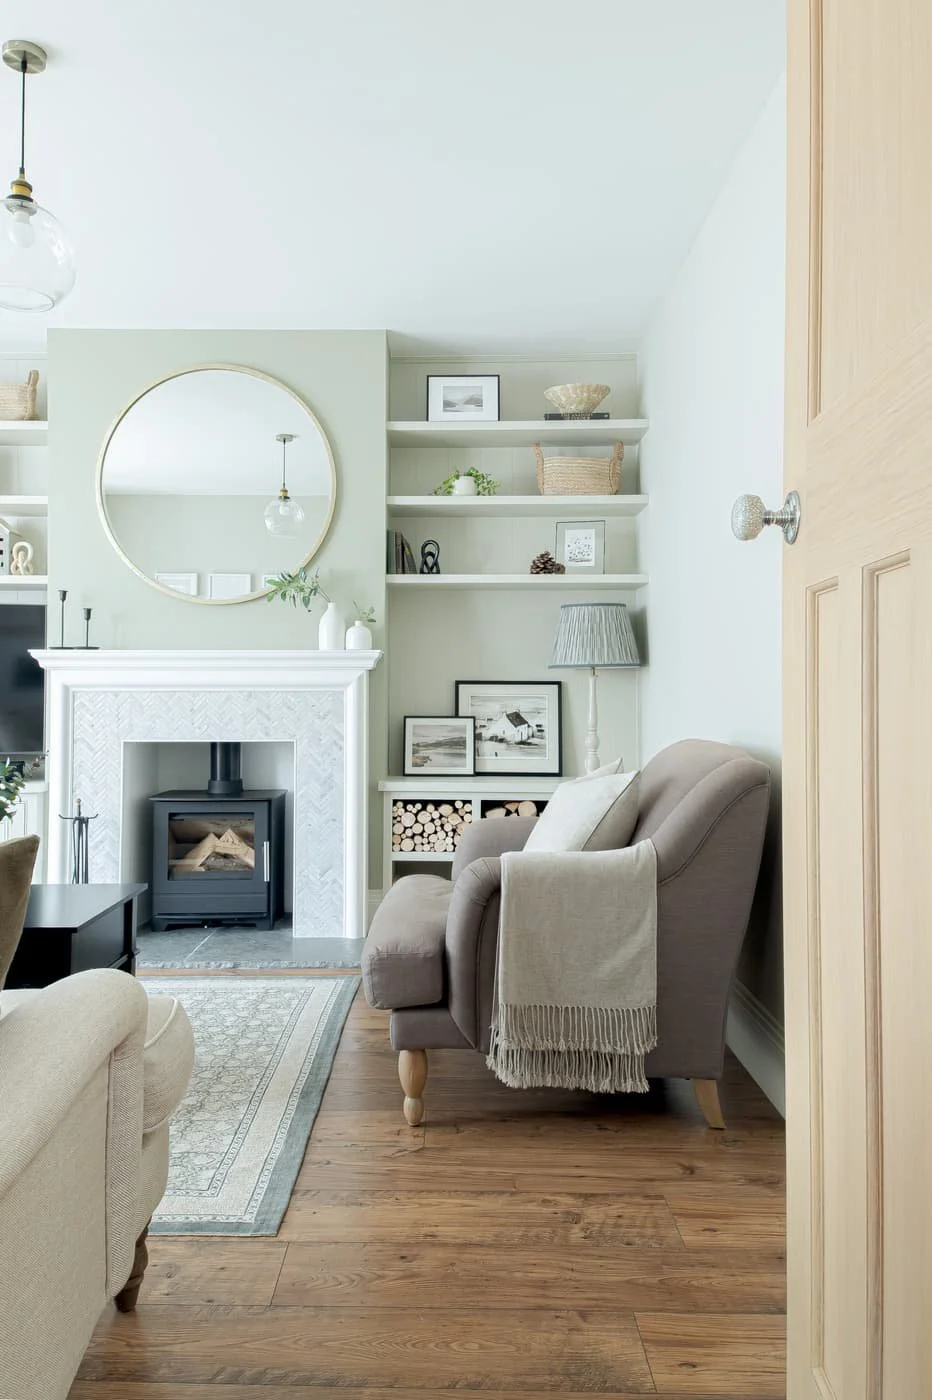
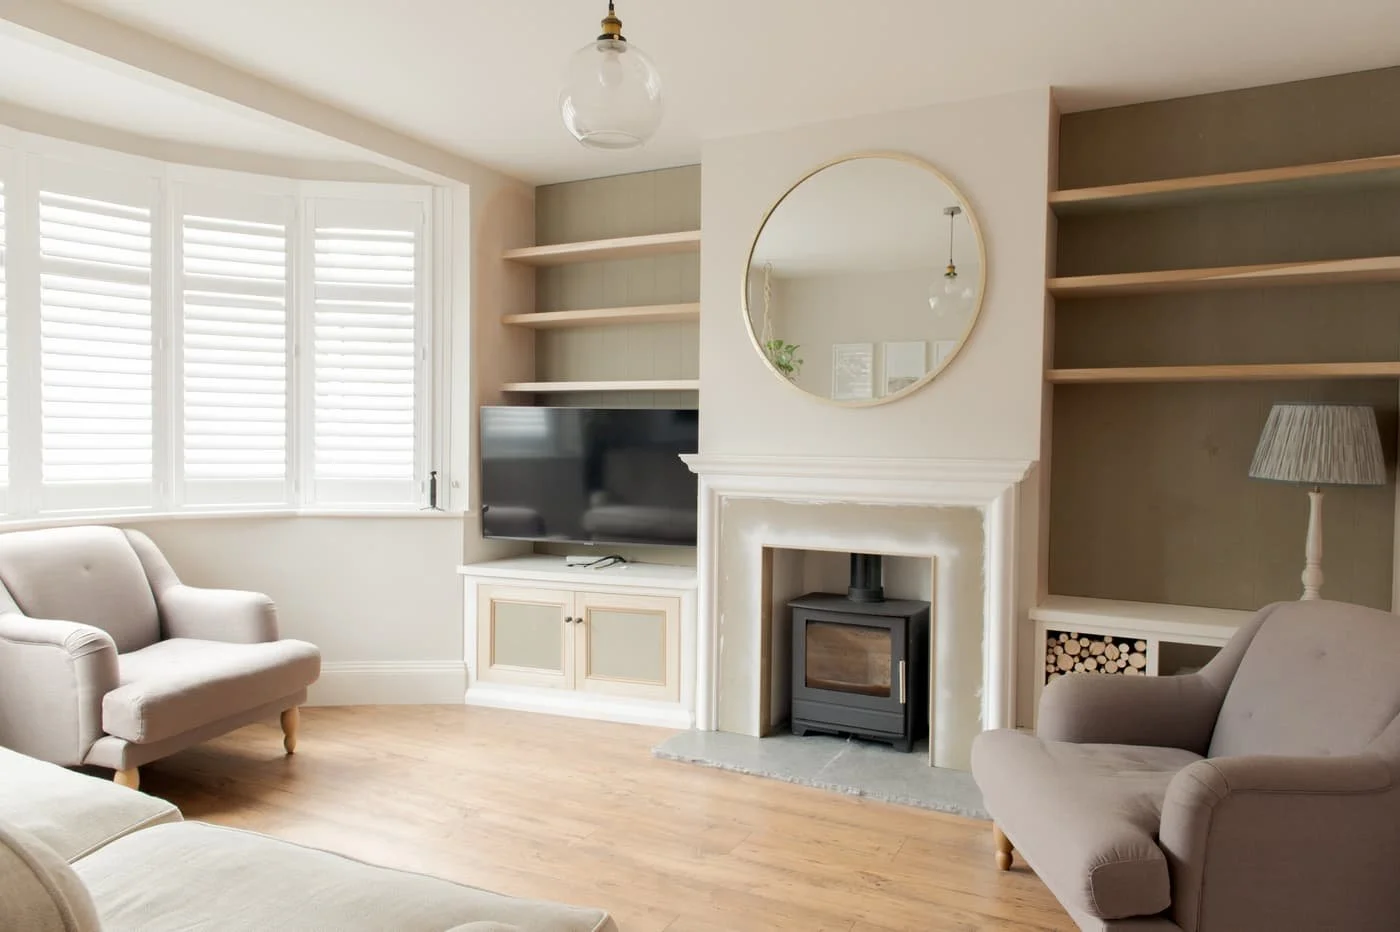
In this recent refresh, we wanted a colour scheme that tied in with the nature & Irish aesthetic of our design vision. I actually proposed a very similar colour scheme for a client last year and fell head over heels with it. So it was time for an upgrade!
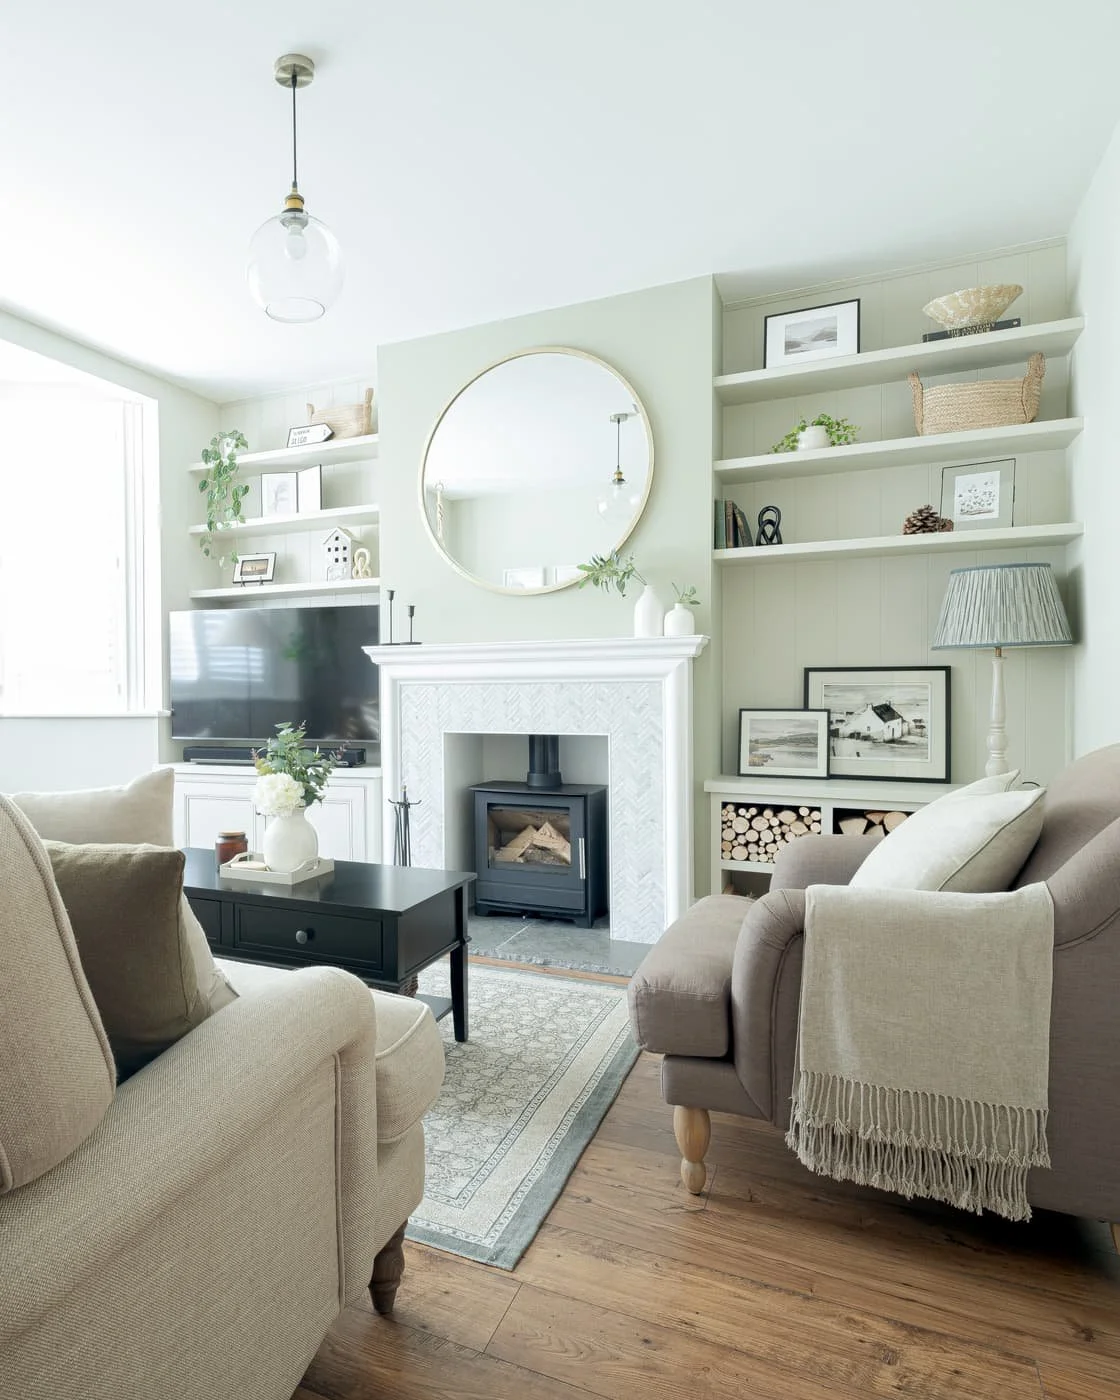
OUR NEW LIVING ROOM DESIGN - COLOUR SCHEME

We painted the chimney breast a focal colour French Gray, and the walls a complementary neutral: Shaded White. Both by Farrow & Ball (although we colour matched and used higher quality paint).
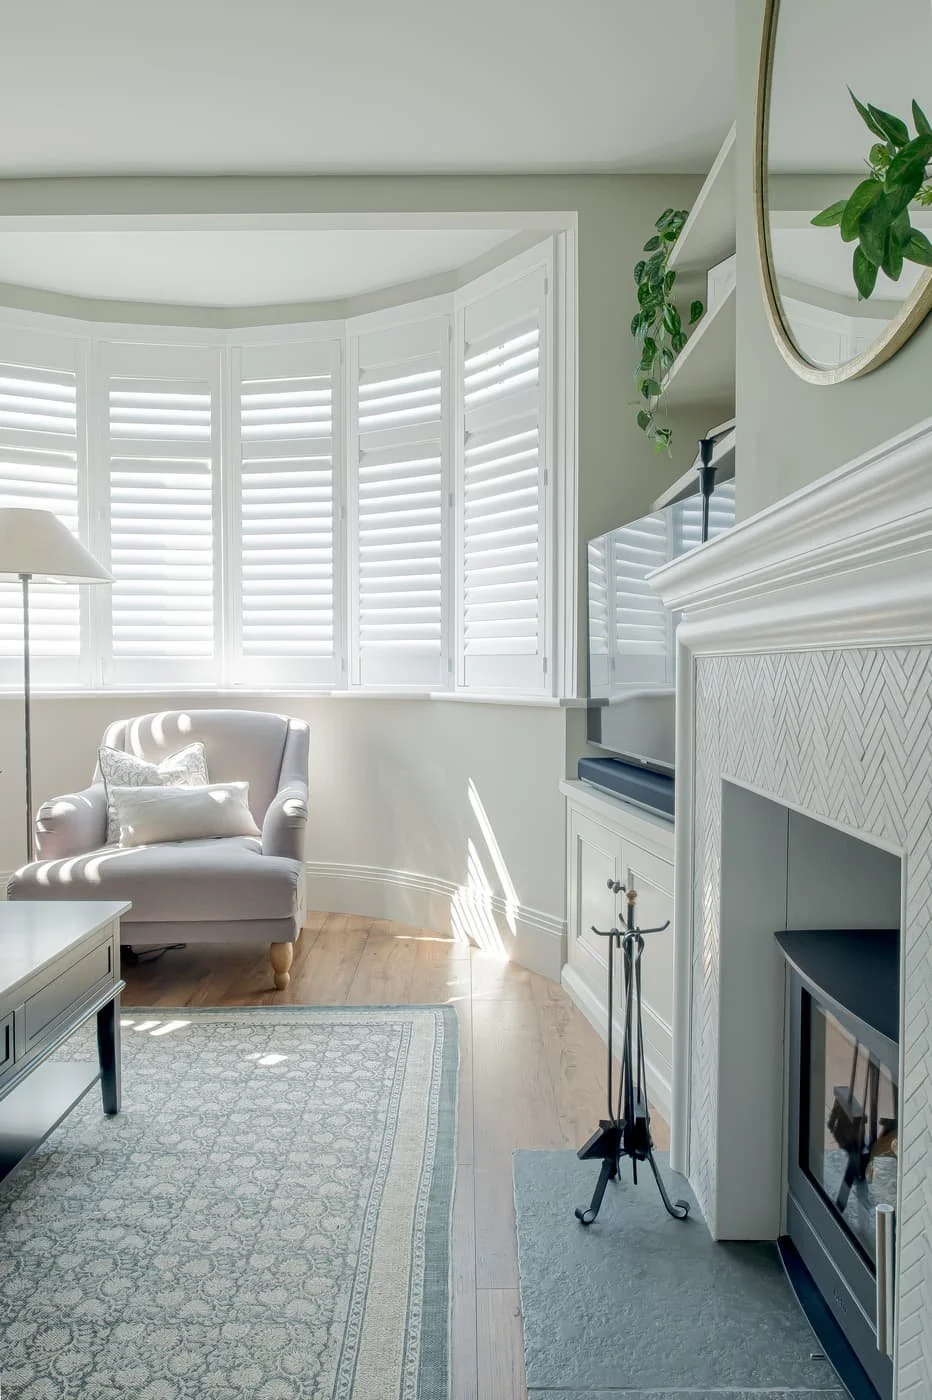
We matched the RAL colour from the shutters (Traffic White) to apply to the window sill and fire surround. Choosing a crisp white brings a contrast and just means these areas won’t need repainting if we change the scheme in a few years.

Morning, noon, and night, this combination of calm colours bring a fresh but cosy feel. Sometimes simple just works, I think.
Colour schemes are a complete minefield when you’re starting out and you have a whole house to paint. That’s why developing your colour palette forms a huge part of my online course content. It can make or break an entire renovation. If you’re a student of ours, check out Home Design Lab Module 3 which provides all the training I’ve ever had in colour so that you can effortlessly pull together your scheme with your home’s orientation and adjoining room colours in mind.


Neil and I have also developed a brand new “Fifi McGee Paint Colour Formula” which is a tried & tested, foolproof method to speed up your colour decisions for every room and every surface, while achieving a pro look. It’s the same method I used in this room. There’s a full tutorial of how to apply this method to your home, and quick guidance on how to choose focal points in your room(s) included in our upcoming Happy Home Painting course.
So if you’re feeling lost in a sea of colour possibilities, our online courses are a great place to find focus and tried & tested methods (I recommend starting with How to Renovate a House – get notified for upcoming enrolments here).
Heating the space & recommendations for your reno
When we first got the keys to our 1930s house renovation, it was fresh from the 70s when night storage heaters were all the go.
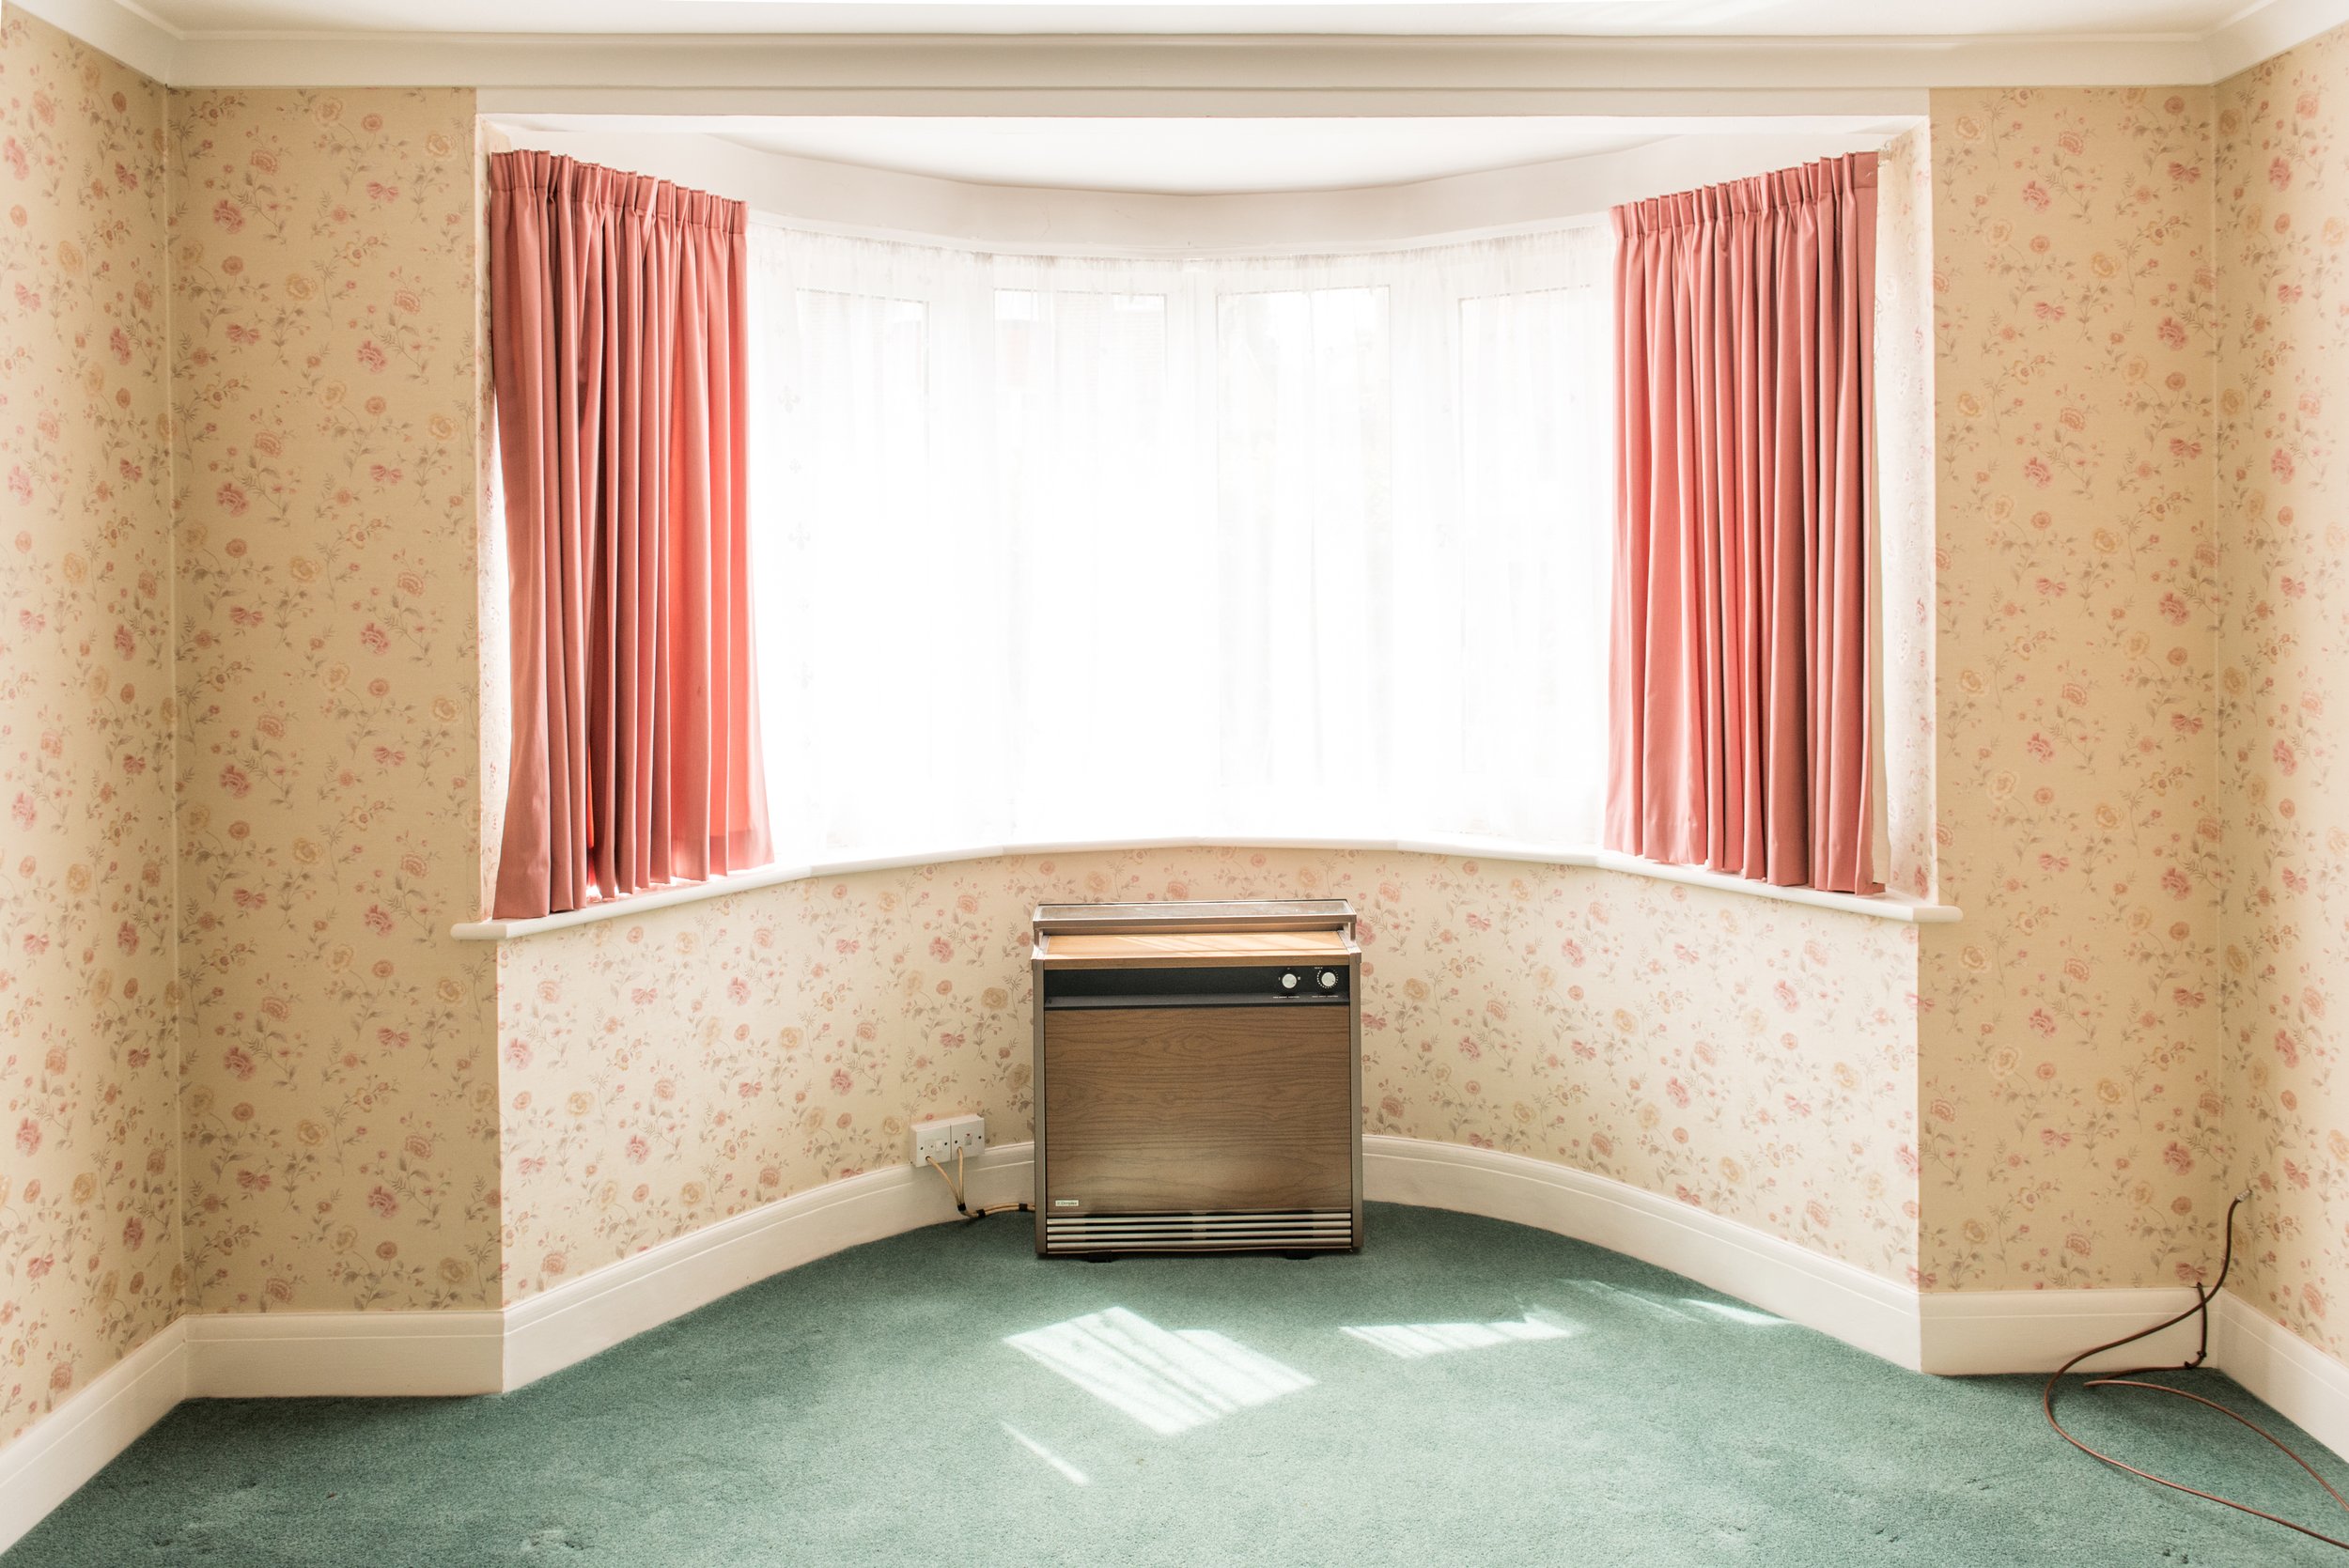
As I mentioned earlier, eco-conscious heating solutions were out of reach and out of our budget back then. So we installed a gas boiler and radiators throughout the property. And in this living room, the radiator sits behind the sofa.
Looking back, our heating decisions were questionable for reasons mentioned.
The good: The install was completed within the small budget we had and the house is heated well 👍🏻
The bad: Fitting radiators takes up precious floor plan space which is a challenge in this small living room
The ugly: The radiator is completely blocked by the sofa. Not ideal for heat output but at least it’s hidden. We pull the sofa out a tad during the winter to allow the heat to rise. And of course, there are more eco-friendly solutions than this.
What you should do if you can: Go for underfloor heating if you can afford to, and you’re planning to rip out and replace floors anyway. It’s not something you can retrofit later. On client projects, we always work with UFH. It futureproofs the home somewhat and frees up the layout no end. You have so many more options with furniture placement which is worth every penny in small rooms and areas that will have minimal wall space like kitchens & bathrooms.
An interim solution: If you’re going down the gas installation route like we did, try to fit radiators under windows. They say it’s more efficient, and from a layout perspective, the window wall usually has no important furniture going up against it so it should be a safer bet. Also consider bay radiators for awkward shaped walls…
In our living room, we have a curved bay. At the time, couldn’t afford a curved radiator to sit underneath. However if you know our renovation well, you’ll remember we installed a curved bay radiator later on, under the windows in the Master bedroom directly above the living room. If we had the funds and our time again, we'd do the same in the living room.
Some heating tips for you to consider:
Ensure your windows aren’t draughty – we replaced all of our front windows with higher spec UPVC (like for like) which improved heat retention in the room
Consider laying insulation between floor joists if you’re planning to reinstate existing floorboards as those gaps can get draughty
Go for UFH if you can afford to (reasons above)
If not, paint exposed radiators the same colour as your walls to make them blend into the background. I propose this for my clients who generally like modern country, calm design.
You could also make the radiator a feature in the room – vertical rads in a bold colour bring a hit of personality to a modern space.
Be diligent with the dimensions you choose for your radiators and try to get slim profile rads that sit as close to the wall as possible. That tape measure needs to be your best bud!
Choosing the living room flooring & what we’d do differently next time
OK I have lots of advice for you here! This living room floor is a laminate wood-look from Quick Step which we installed throughout the ground floor back in 2017. We like it but it’s since been discontinued.

Laminate is great for budget renovations – and great for us at the time, given our budget was very tight!
BUT! If we were renovating this room from scratch again, I’d be going for an LVT which is more expensive but it’s vastly more durable and better quality underfoot. I turn to suppliers like Amtico and Karndean on client projects.
Fun fact: we actually considered lifting all of the ground floor laminate and replacing it with LVT for this living room refresh but for so many reasons, we chose not to. Here’s why:
Scope creep! It would have made the job a lot bigger than we initially planned. We want the entire ground floor to continue having the same flooring which feels cohesive and we just weren’t ready to take this on. We had to focus and prioritise.
Waste! Realistically, we’ll probably get another 2-3 years out of the laminate floor we have. It is showing signs of wear and tear now, 7 years on, but it would have been wasteful in my opinion to lift it and fit LVT.
Scope creep, again! If we do eventually lift all the floors to replace them in years to come, that’s when we need to take the opportunity to update the radiator in the living room for a curved bay radiator. Getting a solid understanding of the steps to renovating a house can help you with the order to do work in. But again, we chose to prioritise aesthetic improvements to deliver on the vision I had for the room rather than a heating and flooring rejig.
What flooring should you go for? It depends on the design you’re going for and the maintenance you require, but if you love the warm and timeless look that wooden floors bring to a room, and you want something virtually maintenance free that you can mop to your heart’s content, LVT gets my vote every time. For 40m2 we were quoted approx £5,000 including installation.
Another option for you is engineered wood flooring. If you’d prefer to prioritise authenticity and quality, you can’t beat engineered wood. We fit this in lower traffic rooms like our Master Bedroom renovation. It’s the real deal, you can sand it, stain it, oil it, but wood isn’t strictly moppable or all that easy to maintain for higher traffic areas. That said, it will wear and its character will evolve with age in high traffic rooms which can be an attractive route for homeowners (depends on your taste). Costs are currently around the same price as LVT however it’s worth factoring in finish costs on top. If your engineered floor doesn’t come finished with a lacquer or oil to protect each board, you need to factor in extra labour costs to sand and oil it.

Flooring, worktop, tiles and material choices are a minefield (just like colour schemes!) 🤯 That’s why we equip our students with cheat sheets, outlining the best, maintenance free and good quality materials for interiors in our renovation courses.
TV, Speakers & Electrics positioning – how to keep your setup simple with killer results
If you want to raise the spec of your living room interior design, a good way to do this is to integrate your TV, speakers and any other tech into joinery work or stud wall configurations so that cables are hidden, they’re positioned in optimal locations and everything is seamless to use.
It requires leg work to pre-plan joinery designs that integrate your tech, but the results are worth it.

Our living room setup is kept simple. While there are so many ways I could improve the lighting and AV in particular, we’ve kept costs low and achieved an OK look that works for us. This is our setup:
Our 49” TV we wall mounted on an adjustable bracket
This allows the TV to be moved left to right and viewed from all angles in the room – and it allows space to sit our Sonos Soundbar directly beneath it
Our team cut a hole in the tongue & groove panelling behind the TV for all of the cables to run behind so that they’re completely hidden
We also have Sonos One speakers that stand either side of our sofa for surround sound (not ideal but they’re inoffensive from a design perspective, small and give decent sound output – not photographed)

HOW THE LIVING ROOM SHELVES PREVIOUSLY LOOKED - WE RECONFIGURED THE BASE UNITS WE INSTALLED IN 2019

ADJUSTMENTS MADE TO THE LIVING ROOM ALCOVE SHELVING & BASE UNITS (PRE-PAINTED)

HIDE THOSE PESKY CABLES!
Speakers & electrics in higher spec house renovations can run into the tens of thousands depending on the quality and complexity. There really is no limit to what can be achieved. We think it’s about considering what’s important to you, room by room, and pricing up specifications to ensure your budget can cover it.
As I say, our setup is basic but you could take your living room up a notch if you wanted, to include:
Lighting under shelving
Built in ceiling speakers
Lights around your fireplace opening
Floor sockets positioned where you’ll place a floor light
Just don’t spoil the look of your living room with ugly speakers that take up way too much space (you know the kind. I weaned Neil off his monstrous black speakers when we moved in, the design gods were with me that day 🙌🏻)
On all of our projects and in our course content, we encourage students to start with budgets & layouts which you really need to have in place so that you can optimise your lighting & electrical specification alongside your floor plan. This is so key to the success of every renovation project. You can do it! 😍


How we light the living room & a simple method for your lighting plans
Much the same as the electrical specifications, our lighting is kept simple:
We have a ceiling light on a dimmer …which we rarely use, seriously. Only when I’m cleaning/hoovering in evenings do I turn the big light on – it’s rare
A table lamp that sits on the right side alcoves. Again, if you make sure you have plug sockets installed to your alcoves, drill a hole through the surface and feed a lamp cable down. Our hole is just thick enough for the cable not the plug. Safely (!) remove and refit the plug while you’re feeding the cable down
A floor lamp that sits behind our sofa – slimline, fits perfectly (not photographed, sorry)
Another floor lamp that sits in the bay window – which is one of my favourite possessions, I adore it

When you’re planning your living room lighting, I recommend positioning floor lamps, wall lights and/or table lamps in a triangle or square layout around the room, the same way we have. This will give you an evenly lit space that’s atmospheric come the evening. Never just rely on just the big light, even if it’s dimmable. Lighting is similar to colour in that you achieve a more professional, curated look if you layer it.
Again, higher spec renovations can go further. You can have your lights and lamps added to the same circuit and operated by the same switch. Saves you having to switch on 3-4 lamps individually. You can have lights timed, gradually switched on mimicking sunrise/sunset… the world is your oyster!
The living room cabinets design & joinery costs if you’re considering a similar look
Our alcove shelves & living room cabinets were built in two phases.
Phase 1 in 2019:

This saw the installation of the base units & thin shelving with decorative brackets. The materials we used for the shelving initially were lower cost (plywood) and we regretted it 😫 They bowed even without any heavy items left on them). The drawer wasn’t the strongest either so we made cuts to the frame and installed higher spec cabinet doors.
Phase 2 in 2023:

It was a massive upgrade to the shelving, fire surround and we hid all the cables. I designed the reconfiguration to the base cabinets with the help of our expert team to build it all. We added tongue & groove MDF panels to the back of each alcove which helped us hide cables and adds modern country detail which I love. It’s the same panelling as the built in office unit I designed for our office upstairs and similar to our open plan kitchen diner. Love the sense of flow!

Building the living room cabinets & shelving

living room shelves going in!
Costs: Excluding the design (I did the design & technical drawings myself, but you could hire a designer to do this for you which wouldn’t be that expensive – or do it yourself) the cost to supply and fit was approximately approx £2K incl VAT to build and fit the bespoke fire surround, supply and fit T&G boards, shelving and doors.
It's a little complicated as the base units were fitted in 2019 by a different carpenter which we had modified during this refresh. So I would say the true total for this look is £2.5-3K all in. Unpainted of course. Hopefully that helps to give you an indication of what to budget for your alcove ideas.
Designing the fire surround & choosing a timeless hearth
Fire surrounds aren’t straightforward to design.
I spent days mulling over the materials & dimensions to ensure it was fire safe, it wouldn’t appear top heavy, the tiles were exposed enough, and the depth of the shelf would give me enough space to style items like Christmas garlands!


The surround is built with a mix of MDF and Vermiculite fire board and then the front is tiled with Kennet Carrara Marble tiles from Neptune. The grout we used was Silver Grey and we sealed the tiles with Lithofin Stain Stop.
The hearth (which is the fireplace floor for anyone unsure) is possibly one of my favourite updates to the room – I know that sounds strange since it’s quite unassuming!


I just love how timeless and practical it is. We chose the Windsor Grey Antiqued Limestone Tiles by Quorn Stone. They’re a supplier I turn to for floor tiles, wall tiles & hearths (if the order we’re making is big enough) for most client projects. The colour reminds me of the Irish dry stone walls surrounding Sligo & Mayo where my family are based in Ireland – and it’s perfect for disguising ash spills.
Sound insulation & why we DIDN’T go with it
If you live in a semi-detached, terraced property or a flat, it can be wise to consider installing sound/acoustic insulation to party walls.
Usually homeowners take this route if they have loud neighbours, they’re sensitive to sound or planning to make a noise yourself, but it’s also a great future-proofing addition to your home.
I would especially advise it if you’re living next door to a HMO who may change tenants frequently or if you’re sensitive to sound and you’re moving into a property with paper thin walls/floors!
Neil and I are lucky that we’ve never had problems with loud neighbours and the structure of the house is pretty sound. But we did consider installing sound insulation boards (supplier recommendations below) behind the tongue & groove panelling, mainly as a future-proofing exercise because they would have been hard to retrofit if we didn’t do it now.
After a lot of research and consideration we decided against it.
Why? Because:
Our neighbours are pretty quiet and the walls are quiet thick
We aren’t really sensitive about sound either (but we do have our limits 😅)
The cost was prohibitive considering we’re not experiencing huge issues with noise
…and we’d have lost a significant amount of space in our alcoves, narrowing our shelves, if we fit sound insulation boards behind the panelling. If you want to do it properly, with decent results, you have to go for pretty thick boards to dull all sound.
So it was a no from us. However!!
When Neil and I were researching options, I reached out to our community for recommendations and here are my notes on the suppliers they used and their results in case this is an area you’re keen to explore:

Again if you come and join the course you’ll get access to a thriving community of UK renovators in the same boat as you – we’re sharing the suppliers to choose (and watch out for), comparable quotes, loads of layout advice and more!
How we integrated the room with the rest of the house – tips to develop cohesion
As I mentioned in the video, if you’re phasing a renovation across multiple years (and even if you’re renovating all in one go!), it can be tricky to know how to create a sense of cohesion between rooms, and ensure everything you invite into the space complements what’s there already.
What works for us and our students is end to end planning. Having a final vision of the room you can work backwards from is important, especially you’re tight on money.
But this takes meticulous preparation prior to any work starting. You’ve got to clarify your budgets, technical plans, research products and solutions, give yourself time for decision making & more.

Discussing the alcove cabinets & shelving design pre-build
It can feel overwhelming, but it doen’t have to be. If you want to prepare in the correct way and avoid a mish mash of styles, it starts and ends with the creation of your Home Design & Renovation Blueprint. This is what I love to help our online course students and clients create. They clarify their affordability, layouts and they define the interior style that makes them feel happy which retains cohesion and keeps them ‘on brief’ – and it brings instant peace of mind.
I’d love to welcome you to our online course for first time renovators to start your renovation with Neil and I guiding you every step and a community of UK renovators who you can lean on for support.

Key takeaways for your living room project:
Guys, renovating is a PROCESS 😂
It’s a marathon, not a race (I think our living room renovation is living proof of that sentence!)
But if you’re diligent with your design, savvy with your budgets and clever with your layout plans, you will create the home you’ve been dreaming about.
Remember Neil and I are right here waiting to help you with your renovation. Whether you’re budgets are big, medium or small, we’re here to hold your hand and get this mammoth project right. The perfect way to start is by joining our online courses and community. You won’t regret it 😄


I just wanted to do a big shout out to our students Janine, Anuj, Jacqueline, Laura, Sharron & Helen to thank them for kindly supporting me with the topics to cover in this post. My aim is to give you exactly what you need, and a huge thanks to these Reno Club members for asking all the questions about our living room renovation that helped to create the content in this post. I love our Reno Team !
I hope this has helped your home refurbishment planning and given you some living room design ideas.
Thank you so much for reading, and it’s so great to have you with us on your journey.
Fi & Neil