Fitting our brand new parquet flooring | Our 1930s house renovation
This post features gifted products
Is it normal to develop a love affair for flooring?! We recently installed engineered wood parquet flooring to our 1930s master bedroom renovation and it’s fair to say we’re head over heels for it despite how long it took to install…
I thought our curved bay radiator stole the show but since our parquet floors were laid, we just can’t stop staring at it 😍
Parquet flooring is one of the most sought after styles of flooring out there currently, so in this post I want to give renovators who may be considering parquet flooring the lowdown on how we chose ours, what they were like to fit, how much it cost in labour and my advice on choosing the right style for your property.

Why did we choose parquet flooring?
When we first got the keys to our 1930s fixer upper, within days we’d ripped out the disgusting shagpile carpet in the master bedroom to reveal pristine pine floorboards underneath. We hit the jackpot. Apart from a major dust and nail removal session (where I cut myself badly and had to go get a tetanus jab!) the floors needed no work.


But as you might not know, pine is a really soft wood. Yes it’s strong, sturdy and great for floorboards, but having lived with bare pine floorboards in other rooms, we quickly realised how easy they are to scratch and dent. Especially when they’re not painted. They started to become scruffy really quickly.
So we made the decision to lay new parquet flooring over the pine floorboards instead to retain the warmth and character wood floors bring to rooms and remain in-keeping with the era of the house.
We’ve not regretted our choice for a second despite them taking a long time to fit, you’ll see how the new floors completely transform a house…

Parquet flooring costs
I’m going to talk to you a bit about costs first because it really informed our decision on the design and fit. We are continually grateful to the brands who offer free of charge products to us in exchange for us sharing an honest and fair review with our renovation community. We approached Oakwoods Flooring who supplied the exact floors we were after that would have cost £1,066 (for 17m2) to supply. The labour we paid for ourselves. We initially thought it would take 2 men 2 days and budgeted £750 to fit it, but it ended up taking 2 men 4 days to completely finish laying the subfloor, the parquet floor and then finish the hearth and fit skirting boards (including that tricky curve in the bay!). The total labour costs worked out at about £1100 which was quite high when we compared costs to fit a sub floor and laminate flooring to the exact same shape room below the bedroom (£670).

It definitely wasn’t a straight forward job which I’ll chat about in a moment, but my words of advice when you’re considering the design and style of parquet flooring (which will effect your costs) are:
Remember that the smaller the block, the longer it will take to fit – it will increase labour costs so go for the largest block that will suit the room
Always budget for the supply and fit of a sub floor, even if you think your floorboards or existing subfloor is level. Parquet needs millimetre accuracy to be laid well.
Don’t forget to budget for the finish of the parquet floor – we chose the Woodlands Eco Pro specifically for this because it arrived already brushed and lacquered. It saved us an extra day in labour costs that would have been spent sanding and sealing, thanks to each block having already been sealed prior to laying.
Budget a little more for areas such as fireplace hearths (if applicable) that are always best laid the same time as the parquet floor – you’ll get a much nicer finish doing these 2 jobs together.
Which style of parquet flooring did we choose and why?
There are so many material options for parquet floors nowadays. There’s parquet laminate which is more affordable and tends to click into place, parquet LVT which again is a more affordable route and tends to be glued down, and of course there’s the classic solid parquet blocks which are usually restored from old buildings or original to the property. We always advise renovators to choose a flooring material that best suits their practical needs (we have guides in our online courses explaining all the pros and cons of each material).

We went with an engineered wood parquet floor in a small-medium block that as I say, was supplied by Oakwoods Flooring (it’s their Woodlands Eco Pro Brushed & Lacquered floor) which definitely costs more to supply and fit than laminate, but it’s far longer lasting and can be sanded/treated in future.
Oakwoods stood out to us as being the right company to trust for this job. They are specialist in wood floors and didn’t just provide us with a high quality, sustainably source floor, their level of personal service was like nothing we’d experienced before (and we’ve ordered a lot in our time).

It’s true what they say, that too often online flooring sellers are “box shifters” paying little or no attention to their customer’s needs, but Oakwoods exceeded our expectations and provided the high level service we were looking for – which is so important to us when we recommend companies to our community. Special shout out to James who is an expert in floors and how they’re best laid. He really advised us well. And by the way I should mention that if you are interested in getting a quote from Oakwoods for any of their floors, let them know we sent you and they’ll throw in a free cleaning kit with your order. Woop woop.
Anyway, while there are some fantastic laminate lookalikes out there which were tempting being more affordable in terms of labour, we were adamant we wanted to lay a wooden floor that would last for hundreds of years and bring real heart and character to the room, so an engineered wood parquet floor was the one for us.
Choosing the right design of parquet for your property
For us, the choice of parquet flooring was easy, but actually finding the right stock was really hard. When you’re fitting parquet to a floor, you really want to be considering what the overall size of the room is and try to visualise how different sized blocks may look. For example, when you have a very large room, say a kitchen diner extension, you can afford to select large parquet blocks. You will still be able to see the pattern clearly across the room as there is enough open space between furniture to see the joins. But say you have a small bedroom like ours, laying a large parquet block wouldn’t have worked as there would be fewer joins, likely hidden under furniture. For small to medium rooms, I recommend small to medium blocks like the ones we chose. For large rooms and open plan living, I recommend medium to large blocks.

In terms of the finish and stain, it really depends on the interior style you’re looking to achieve and the practical needs you have for the room. A lighter wood will suit a scandi, modern or traditional interior and make a room feel bigger. A darker wood will suit moody, industrial and rustic interiors and make rooms feel cosier.
We chose this honey-like, warm oak parquet floor to bring character to the room. We have a Modern Country theme through the house (it’s the perfect look for us as we’re so inspired by nature) and this raw, natural finish was just right for that. It also works beautifully with the colours we’ve chosen for the walls in here – going for a nature-inspired theme of calm green and stone.
Installing the parquet flooring
Day 1

Our carpenter Matt and his son Max are our go-to guys for work like this. They’re great communicators, meticulous with their work and generally really fun to have around. All important qualities when you’re hiring trades (our How to Renovate a House Online Course has lots more information on managing contractors).
We briefed them fully with what was needed before this day, so they hit the ground running (pardon the pun) by securing every floorboard to ensure no creaks.


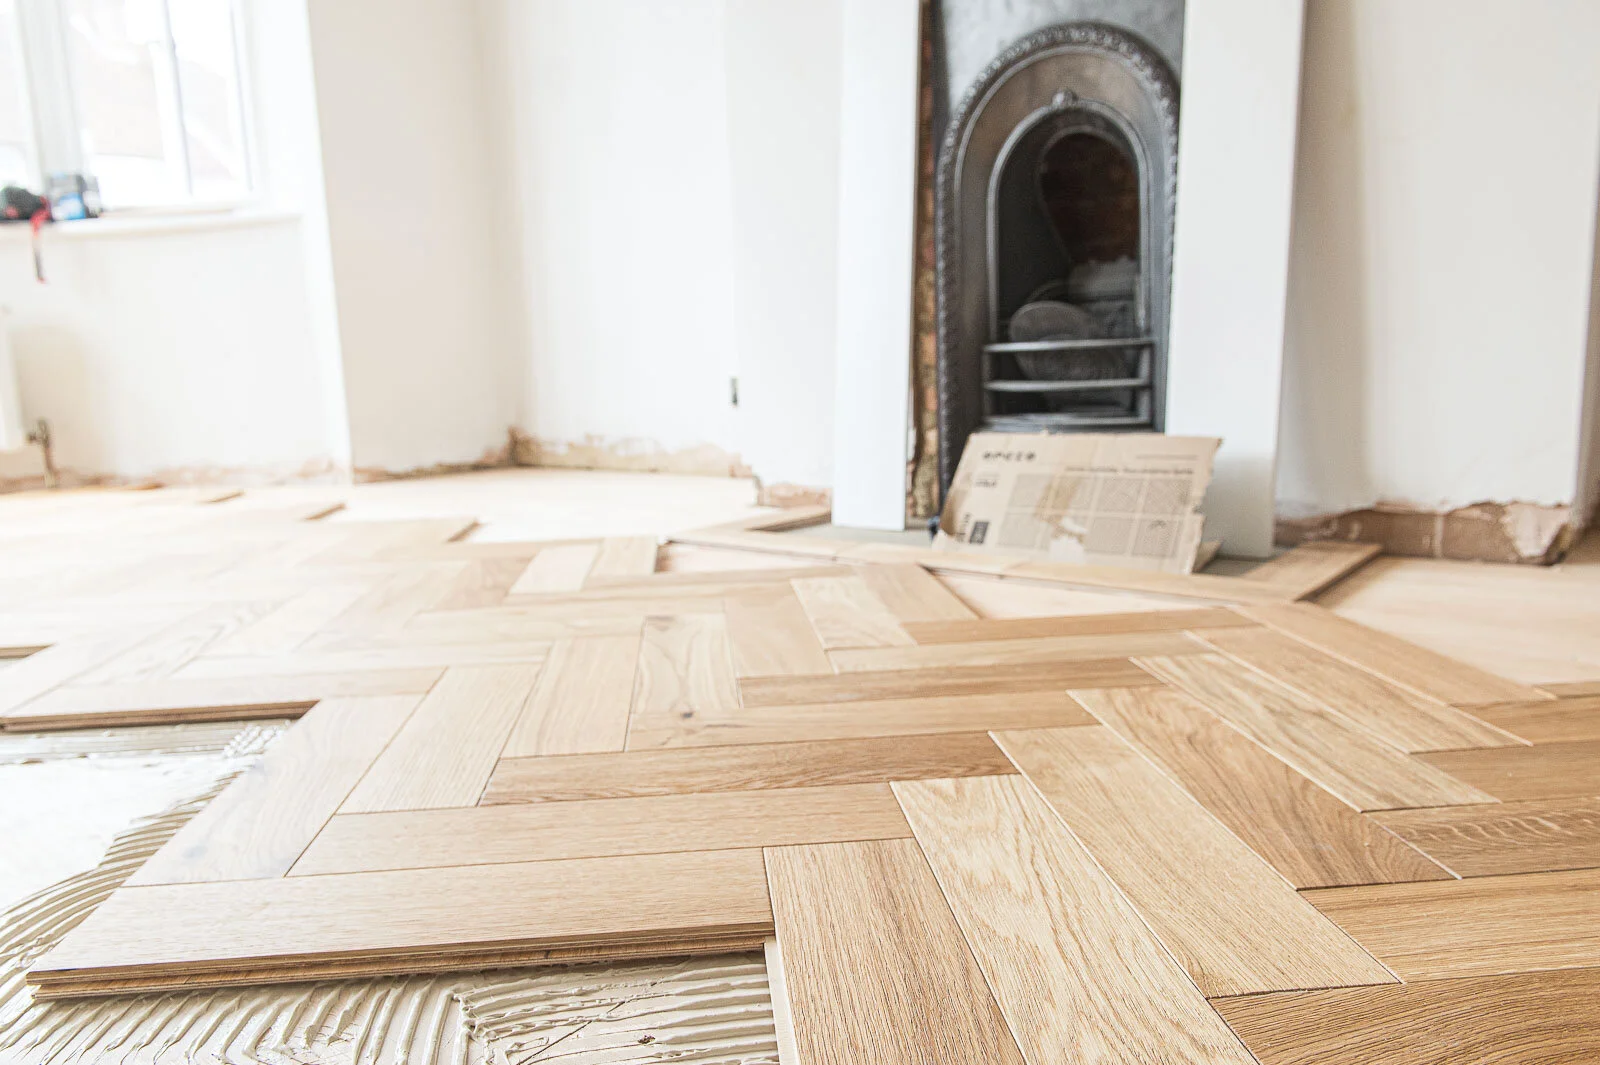
The subfloor was laid – we were advised to lay a 12mm plywood but we went thicker (18mm) to ensure a solid finish. We also decided how the hearth would be laid out, how far it would come into the room and what formation the tiles should be laid. These are the rectangular Dorsaf Limestone tiles from Topps Tiles that are heat proof (in case any future homeowner wanted to open the fireplace up and have a working fire in here) which we laid in a Free Length pattern.
Day 2
The lads got to work laying the first run of parquet. It was like watching a giant puzzle coming to life before our eyes. Each block has a tongue and groove on all 4 sides, which meant every edge fastened one against the other. They had to work fast to glue down and then click in place each piece.


This was the fastest part of the job. The main floor area they got done by the end of the day, it’s the tiny cuts that took far longer than planned to get right. But we were elated with it already. They also laid the fireplace tiles too. Seeing my designs, the limestone against the raw oak, come to life never gets old.
Day 3
If you’ve renovated before you’ll know exactly what it feels like to see flooring – normally the last piece of the puzzle – being laid and how it instantly ‘finishes’ a room. Day 3 the lads made a start on all of the edges. There were some pretty tricky cuts to make to ensure the parquet looked right up against the curved bay.


Often when you see parquet floors they have a stunning border of either one block or two going right around the perimeter of the room, framing the parquet. We decided to only have this feature around the fireplace hearth because of the curved bay. We couldn’t lay a border to the curve, so we didn’t do one at all – and it’s no loss, in my opinion. It’s a small room in comparison to a lot of other rooms you see parquet flooring being laid on, so it looks just as good without a border.
Day 4
Those final, finishing cuts were complete and the lads focused on installing the fire insert and the fire surround which we had made for us by another local carpenter who is great at cabinetry making. Neil and I drew what we wanted, and he went away and built it. Pretty straight forward, and pretty affordable too (£150 for the wooden surround which I sanded, primed and painted).


All that was left to do was fit the skirting board. Not as straight forward as your average room, that curved bay proved to be a bit of a head scratcher when we were making plans for the bedroom. In our room downstairs (curved bay) the skirting board was made from MDF that was cut into and bent into place. It was a challenge and a half and didn’t come cheap! Luckily this time round, technology moved on and we found flexible skirting board that’s paintable. It definitely isn’t perfect and it was tricky to cut. You can imagine Matt, who is a lover of word and working with strong materials, he hated this stuff, but it did the trick and saved us a bit of money too. It’s the SX155 skirting board (flexible option) from W M Boyle.
By the end of the day, it was complete. We finally got the floor of our dreams and the master bedroom renovation had one of it’s biggest milestones complete.

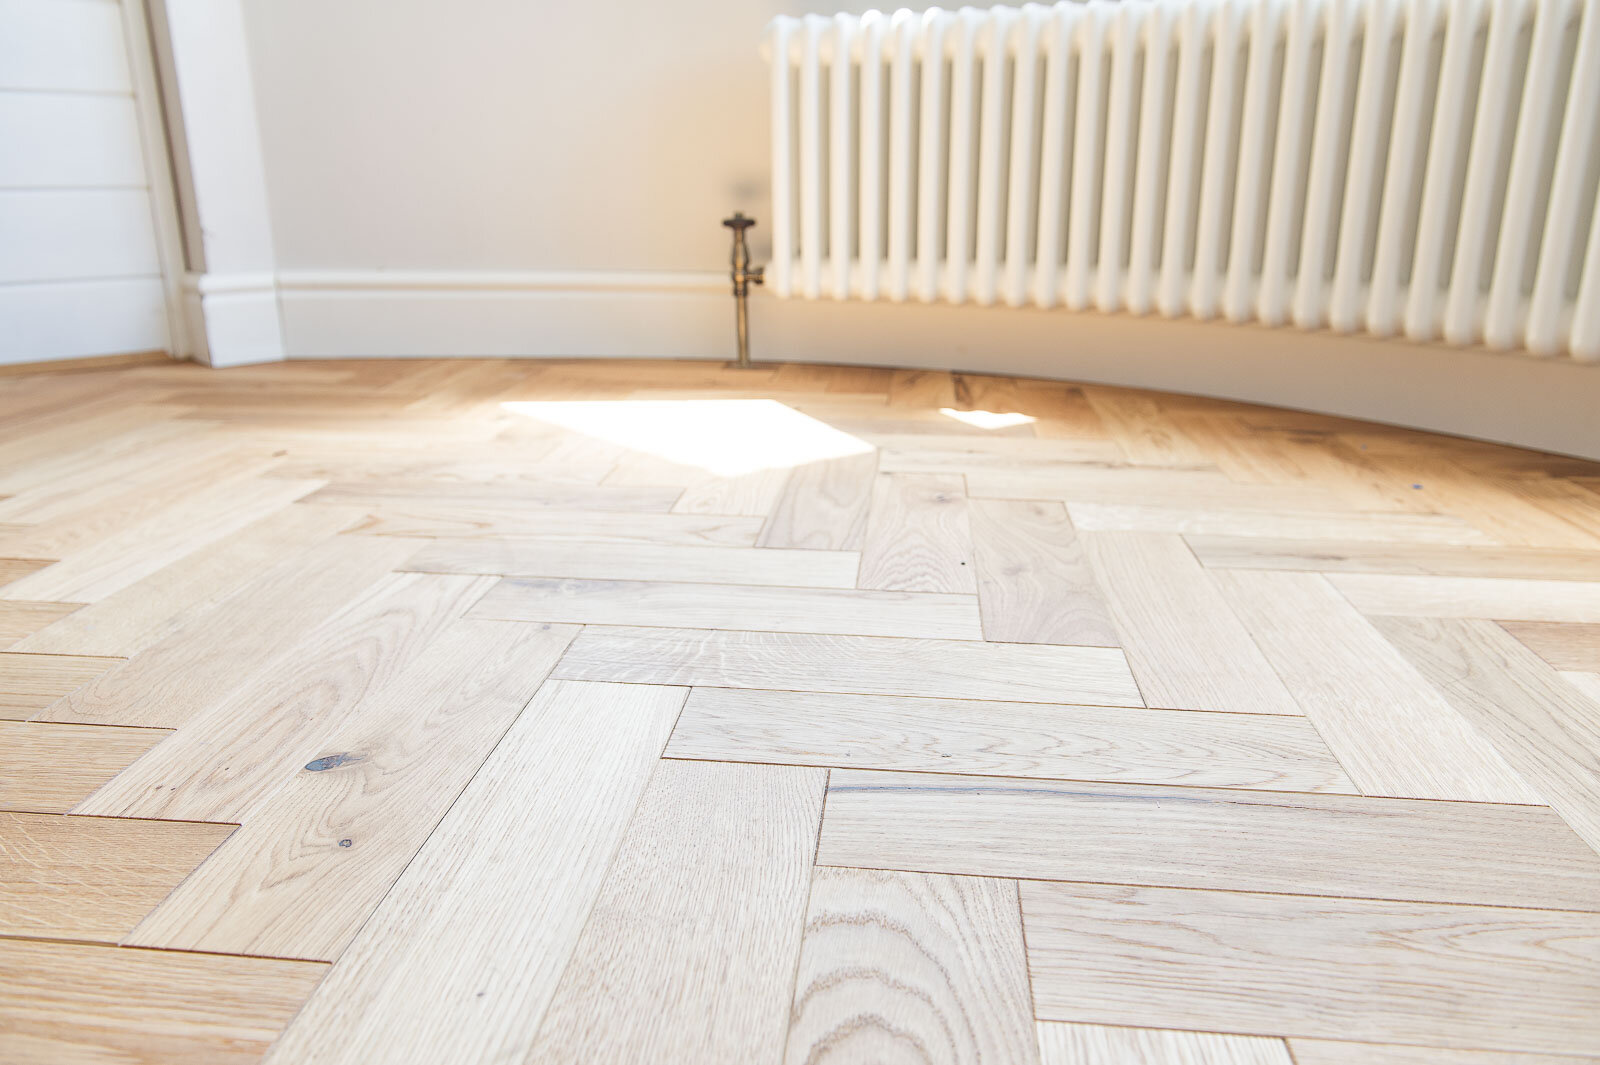

We are SO pleased with the results and while it did take longer than we thought, we’re considering laying the same floor in other rooms upstairs for cohesion.
I hope this post has helped you suss out whether parquet flooring is right for you. Remember Neil and I support renovators through online courses if you’d like help with your projects.
We would love to support you

If you’re renovating a property and you’re lost with how to budget, get to grips with the timeline of events to prevent mistakes, and understand how to hire the right contractors then look at How to Renovate a House which is for first-time renovators and includes access to our incredible Reno Club community.
If you’re decorating a property and want to deep dive on your home design plans, get the know-how from my experience as an interior designer, without completely handing over control (and the hefty fees!) then look at Home Design Lab. It’s for those who are committed to learning the ropes of interior design in order to get an incredible finish in their property that speaks to their personality.
Thanks for reading,
Fi (and Neil!) xoxo